Are you tired of using bloated portfolio plugins that slow down your WordPress site? Or maybe you’re a developer wanting to learn how to create your own WordPress plugins?
Building a custom portfolio plugin is the perfect starting point for WordPress development. It teaches you the core concepts—custom post types, taxonomies, shortcodes, and the Settings API—while creating something genuinely useful.
In this complete tutorial series, you’ll build a professional portfolio plugin from absolute zero. No prior plugin development experience required. Just basic PHP and WordPress knowledge.
By the end, you’ll have a fully functional portfolio plugin with category filtering, lightbox support, and customizable settings—plus the skills to build any WordPress plugin you can imagine.
Why Build a Custom Portfolio Plugin?
Before diving into code, let’s understand why building your own plugin beats using pre-made solutions:
Performance: Most commercial portfolio plugins load dozens of CSS and JavaScript files on every page—even when no portfolio exists. Your custom plugin will load assets only when needed.
Learning Value: Building a plugin teaches you WordPress architecture better than any course. You’ll understand hooks, post types, queries, and the Settings API at a deep level.
Career Growth: WordPress powers over 43% of all websites on the internet. Companies pay premium rates for developers who can build custom plugins. This single skill can transform your freelancing career.
Complete Control: Want to change how your portfolio displays? Modify one file. No digging through 10,000 lines of someone else’s spaghetti code.
What You’ll Build
Throughout this 10-part series, you’ll create “WP Creative Portfolio”—a production-ready portfolio plugin that includes:
✅ Custom “Portfolio” post type with featured image support
✅ Portfolio categories taxonomy for organizing work
✅ Filterable grid layout with JavaScript filtering
✅ Lightbox popup for images
✅ Shortcode system with customizable parameters
✅ Settings page to control labels, URLs, and display options
✅ Proper asset loading (CSS/JS only when needed)
✅ Security best practices (escaping, validation, nonces)
Here’s what the finished plugin looks like:
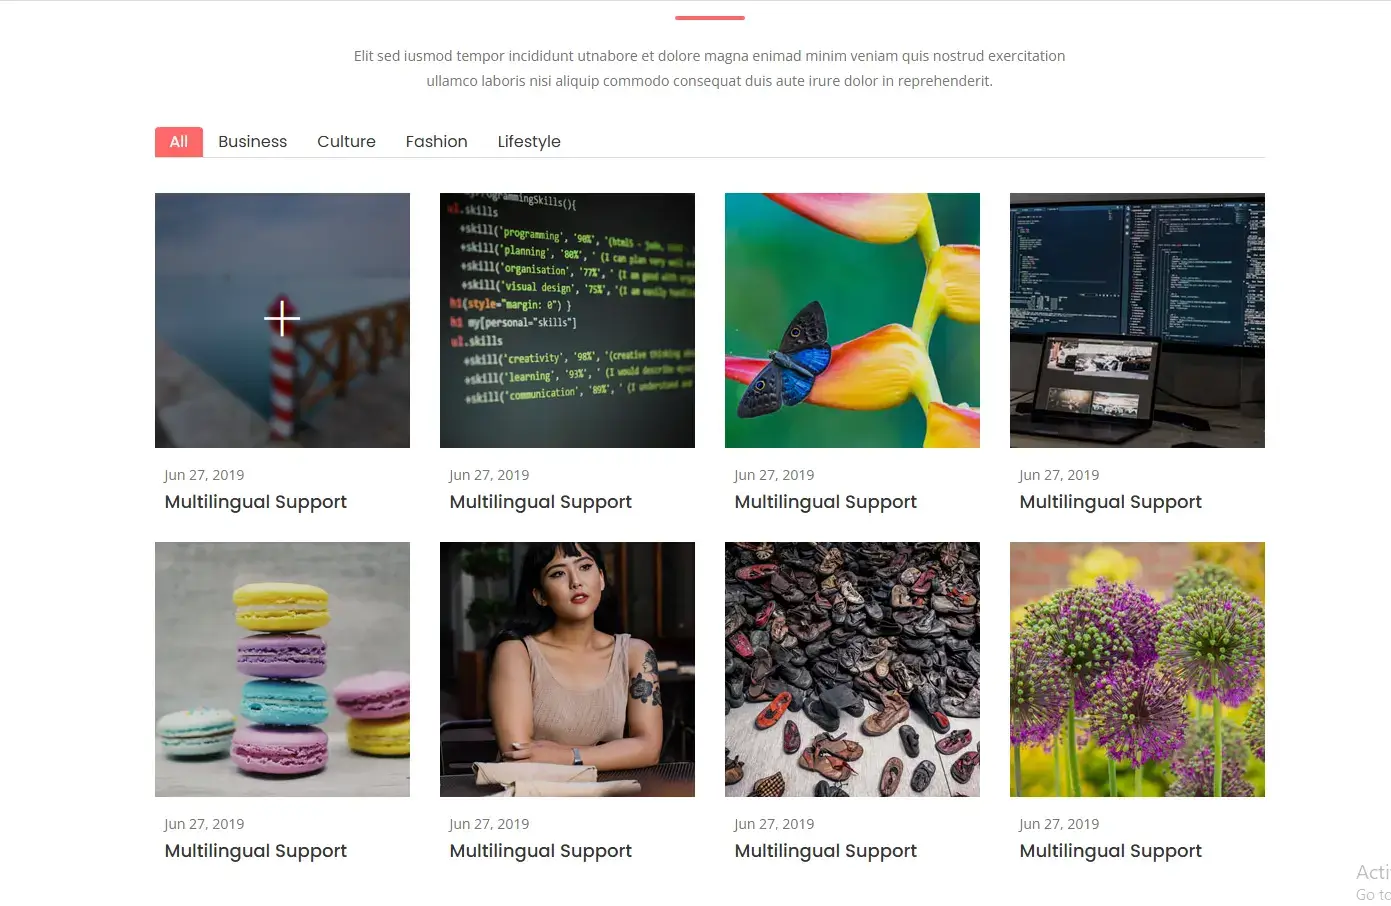
Figure 1: The completed WP Creative Portfolio plugin displaying a filterable portfolio grid
Series Overview: Your 10-Step Roadmap
| No. | Topic | What You’ll Learn |
|---|---|---|
| 1 | Course Preview | Series overview & prerequisites (you’re here!) |
| 2 | Plugin File Structure | Main plugin file, headers, constants |
| 3 | Custom Post Types | Creating portfolio post type with register_post_type() |
| 4 | Custom Taxonomies | Building categories with register_taxonomy() |
| 5 | Enqueuing Assets | Loading CSS/JS the WordPress way |
| 6 | Shortcodes | Creating [wp_creative_portfolio] shortcode |
| 7 | WP_Query & Display | Querying posts and building the grid |
| 8 | Security | Sanitization, escaping, and nonces |
| 9 | Activation Hooks | Fixing 404 errors with flush_rewrite_rules() |
| 10 | Settings API | Building a professional settings page |
Prerequisites: What You Need Before Starting
This tutorial assumes you have:
-
A WordPress installation (local or hosted) – If you need a local environment, check out Local by Flywheel or XAMPP
-
A code editor – VS Code (free), Sublime Text (I’ll be using it), or PHPStorm
-
Basic PHP knowledge – Understanding variables, functions, and arrays is enough
-
FTP/SFTP access or local development setup
Don’t worry if you’re not a PHP expert. I’ll explain every line of code as we write it.
The “Portfolio Plugin” Concept
Let’s clarify what we’re building. A portfolio plugin needs to:
Store data: Custom post type for portfolio items (title, description, featured image)
Organize content: Categories to group similar work (web design, branding, print)
Display beautifully: Grid layout with filtering and lightbox
Stay flexible: Settings so users can customize without touching code
This is exactly what real-world clients request. Web designers need portfolios. Photographers need galleries. Agencies need case studies. Your plugin serves all these use cases.
Download the Course Files
To follow along, you’ll need the HTML template files that provide our CSS styling and JavaScript. These aren’t the focus of the tutorial (we’re learning PHP/WordPress), so you can download the complete asset package here:
Enter your details below to receive the HTML ZIP file instantly via email. In the next lesson, we’ll use this HTML to build a fully functional WordPress plugin step by step.
The package includes:
-
Complete CSS files (plugins.css, main.css, responsive.css)
-
JavaScript files with filtering and lightbox functionality
-
Icon fonts and images
-
HTML template for reference
Plugin Development Best Practices (Learn These Now)
Before writing code, understand these principles that separate amateur plugins from professional ones:
1. Never Echo Directly
WordPress has specific ways to output content. We’ll use return for shortcodes and proper escaping functions.
2. Prefix Everything
WordPress has thousands of functions and variables. Without prefixes, you’ll conflict with other plugins. We’ll use wpcp_ and wp_creative_portfolio_ prefixes throughout.
3. Load Assets Intelligently
Many plugins load CSS on every page. We’ll register assets globally but enqueue them only when our shortcode is present.
4. Security First
Every user input is potentially malicious. We’ll sanitize, validate, and escape everything.
5. Make It Translation Ready
Your plugin might be used anywhere in the world. We’ll use WordPress i18n functions from day one.
The Plugin Structure: Where Files Go
WordPress plugins live in /wp-content/plugins/. Create this folder structure now:
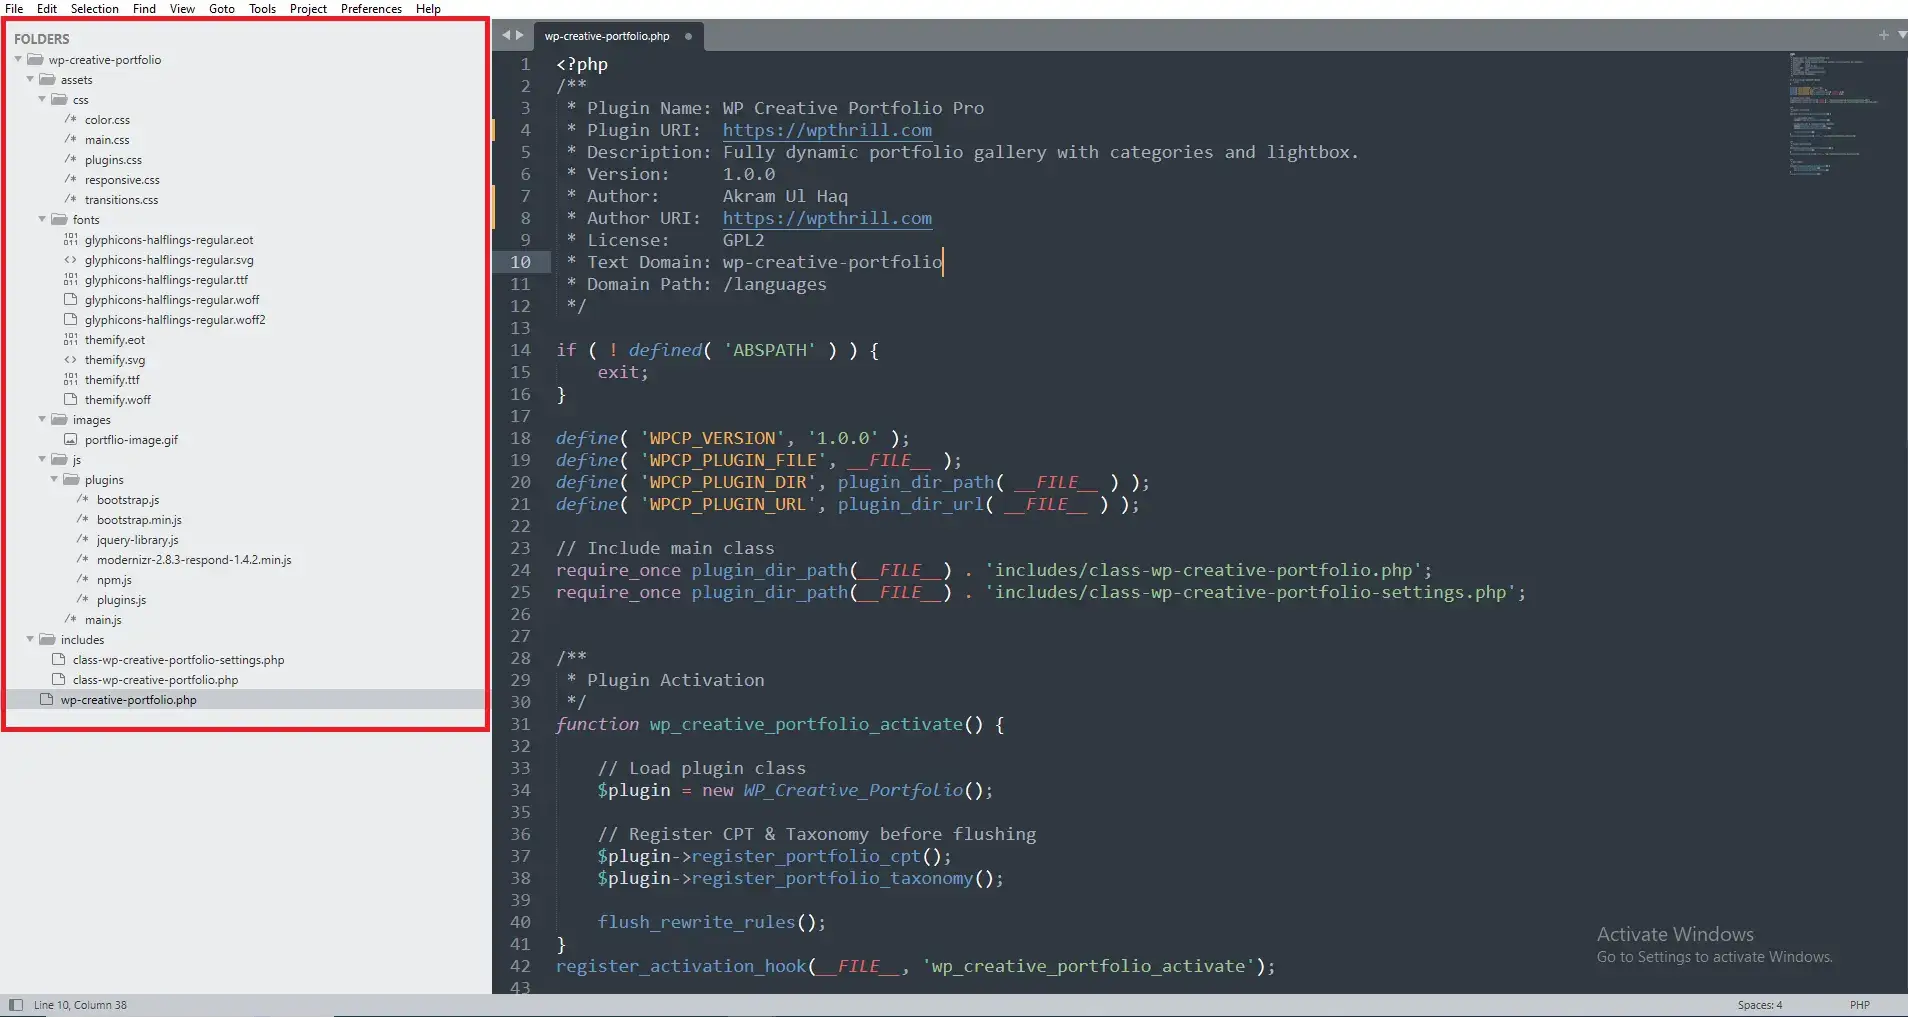
Why This Structure?
This organization follows WordPress coding standards and industry best practices:
-
Main plugin file: WordPress looks here first. Contains plugin header and bootstrapping code.
-
Includes folder: Houses PHP classes, keeping code organized and autoloader-ready.
-
Assets folder: All frontend resources in one place. Easy to manage and optimize.
-
Languages folder: Required for WordPress.org translation compatibility.
What Makes This Tutorial Different?
You’ve probably seen other “build a plugin” tutorials. Here’s why this one delivers real results:
You build a REAL plugin. Not a “Hello World” example that teaches nothing. You’ll have a portfolio plugin you can actually use on client sites.
Modern WordPress practices. We use show_in_rest for Gutenberg compatibility, proper asset enqueuing, and the latest security standards.
Production-ready code. Every file includes error handling, security measures, and follows WordPress coding standards.
Complete ecosystem. By the end, you’ll understand hooks, queries, the Settings API, and rewrite rules—everything needed for any plugin project.
The Business Case: Why Plugin Skills Pay
Let’s talk money. Freelance WordPress developers with custom plugin skills command higher rates because they solve problems that off-the-shelf plugins can’t.
A typical “install and configure” WordPress developer charges $50-75/hour. A developer who can build custom plugins charges $100-150/hour—or more.
Why? Because custom functionality solves unique business needs. When a client needs specific features, you’re not limited to “whatever plugin exists.” You build exactly what they need.
This single skillset separates hobbyists from professionals.
Common Questions Beginners Ask
Is this too advanced for me?
If you can write a basic PHP function and understand the WordPress admin area, you’re ready. Every concept is explained step-by-step as we encounter it, so you won’t feel lost.
How long will this take?
The full series is approximately 2–3 hours of video content. Plan for around 4–5 hours total if you code along and experiment with the concepts.
Will this work with my theme?
Yes! The plugin you build is completely theme-independent. It will work with any properly coded WordPress theme.
Can I sell this plugin?
Absolutely. You will own all the code you write in this course. The techniques you learn can be used for commercial plugin development and client projects.
Your First Step: Create the Main Plugin File
Let’s start coding. Navigate to your plugin folder and create wp-creative-portfolio.php. Add this code:
<?php
/**
 * Plugin Name: WP Creative Portfolio Pro
 * Plugin URI:  https://yourwebsite.com/wp-creative-portfolio
 * Description: A complete portfolio plugin with categories, lightbox, and shortcodes. Perfect for designers, photographers, and agencies.
 * Version:     1.0.0
 * Author:      Your Name
 * Author URI:  https://yourwebsite.com
 * License:     GPL v2 or later
 * License URI: https://www.gnu.org/licenses/gpl-2.0.html
 * Text Domain: wp-creative-portfolio
 * Domain Path: /languages
 *
 * @package WP_Creative_Portfolio
 */

// Prevent direct access
if ( ! defined( 'ABSPATH' ) ) {
    exit;
}

// Define plugin constants for easy reference
define( 'WPCP_VERSION', '1.0.0' );
define( 'WPCP_PLUGIN_FILE', __FILE__ );
define( 'WPCP_PLUGIN_DIR', plugin_dir_path( __FILE__ ) );
define( 'WPCP_PLUGIN_URL', plugin_dir_url( __FILE__ ) );

Figure 3: Your plugin appears in the WordPress admin after file creation
Breaking Down the Code
Let’s examine what each section does:
Plugin Header (lines 3-13): WordPress reads this comment block to display your plugin in the admin. Each line serves a specific purpose:
-
Plugin Name:What users see in the plugins list -
Description:Explains what your plugin does (includes keywords for search!) -
Version:Helps users know if they have the latest version -
Text Domain:Enables translation support -
Domain Path:Where translation files live
ABSPATH Check (lines 16-18): This security measure prevents direct access to your PHP file. If someone tries to load this file directly in their browser, WordPress’ ABSPATH constant won’t be defined, and the script exits silently.
Constants (lines 21-24): Defining constants makes your code maintainable:
-
WPCP_VERSION:Single source of truth for version number -
WPCP_PLUGIN_FILE:Reference to the main plugin file -
WPCP_PLUGIN_DIR:Server path to your plugin folder -
WPCP_PLUGIN_URL:URL to your plugin folder (for assets)
What’s Next?
Save this file and activate your plugin from WordPress admin. Nothing visible happens yet—that’s normal! Your plugin is like a car with the engine built but no wheels attached.
In Video 2, we’ll add the main plugin class and start building our portfolio custom post type.
But first, download the course assets and set up your folder structure. Having everything ready before the next video makes learning smoother.
[DOWNLOAD BUTTON: Download Course Assets Now]
Quick Win: Verify Your Setup
Before moving on, confirm everything works:
-
Navigate to WordPress Admin → Plugins
-
Find “WP Creative Portfolio Pro” in the list
-
Click “Activate”
-
No errors? Perfect! You’re ready for Video 2.
Join the Discussion
Building your first plugin raises questions. That’s normal and good! Drop your questions in the comments below, and I’ll help you troubleshoot.
Common issues at this stage:
-
Plugin doesn’t appear in admin? Check file permissions and location.
-
White screen after activation? Enable WP_DEBUG in wp-config.php. Or check How to Enable WordPress Debug Mode to Find Errors
-
Confused about folder structure? The screenshot above shows exactly where everything goes.