This guide is part of our complete WordPress tutorial series, where we take you step-by-step from beginner to advanced level.
If you’re just starting out, you can explore the full structured roadmap here: Complete WordPress Tutorial: Beginners to Experts.
And if you haven’t learned how to access your dashboard yet, make sure you first read: How to Login to WordPress (WP-Admin Guide).
Now, let’s continue.
Picture this: You’ve just installed WordPress. You’re excited to build your website. You log in for the first time, and suddenly you’re staring at a complex interface with menus, buttons, and options everywhere. Your excitement quickly turns to confusion.
Sound familiar?
You’re not alone. Every single WordPress professional—including me—remembers that overwhelming first moment. The WordPress dashboard is incredibly powerful, but without guidance, it can feel like trying to pilot a Boeing 747 with no training.
Here’s the good news: The WordPress dashboard is actually designed with beginners in mind. Once you understand what everything does, you’ll wonder why you ever felt intimidated.
In this comprehensive guide, we’re going to demystify every corner of the WordPress admin area. I’ve been building WordPress sites for over [X] years, and I’ll show you exactly what matters—and what you can safely ignore as a beginner.
Let’s transform you from a confused newcomer into a confident WordPress user.
What Is the WordPress Dashboard? (And Why It Matters)
Before we dive into the details, let’s establish what the dashboard actually is.
The WordPress Dashboard (also called the WordPress Admin Area or wp-admin) is the backend control panel of your WordPress website. It’s where you:
-
Create and manage content (posts, pages, media)
-
Control your site’s appearance and layout
-
Install plugins to add functionality
-
Manage user accounts and permissions
-
Configure site settings and preferences
Think of it this way: Your website is like a store. The front end (what visitors see) is the showroom. The dashboard is the back office—the stockroom, the planning desk, and the management office all rolled into one.
Chapter 1: Getting Inside – How to Access Your Dashboard
Let’s start with the absolute basics: logging in.
The Login URL
Every WordPress site has a standard login address. Simply add /wp-admin or /wp-login.php to the end of your domain:
https://yoursite.com/wp-admin
or
https://yoursite.com/wp-login.php
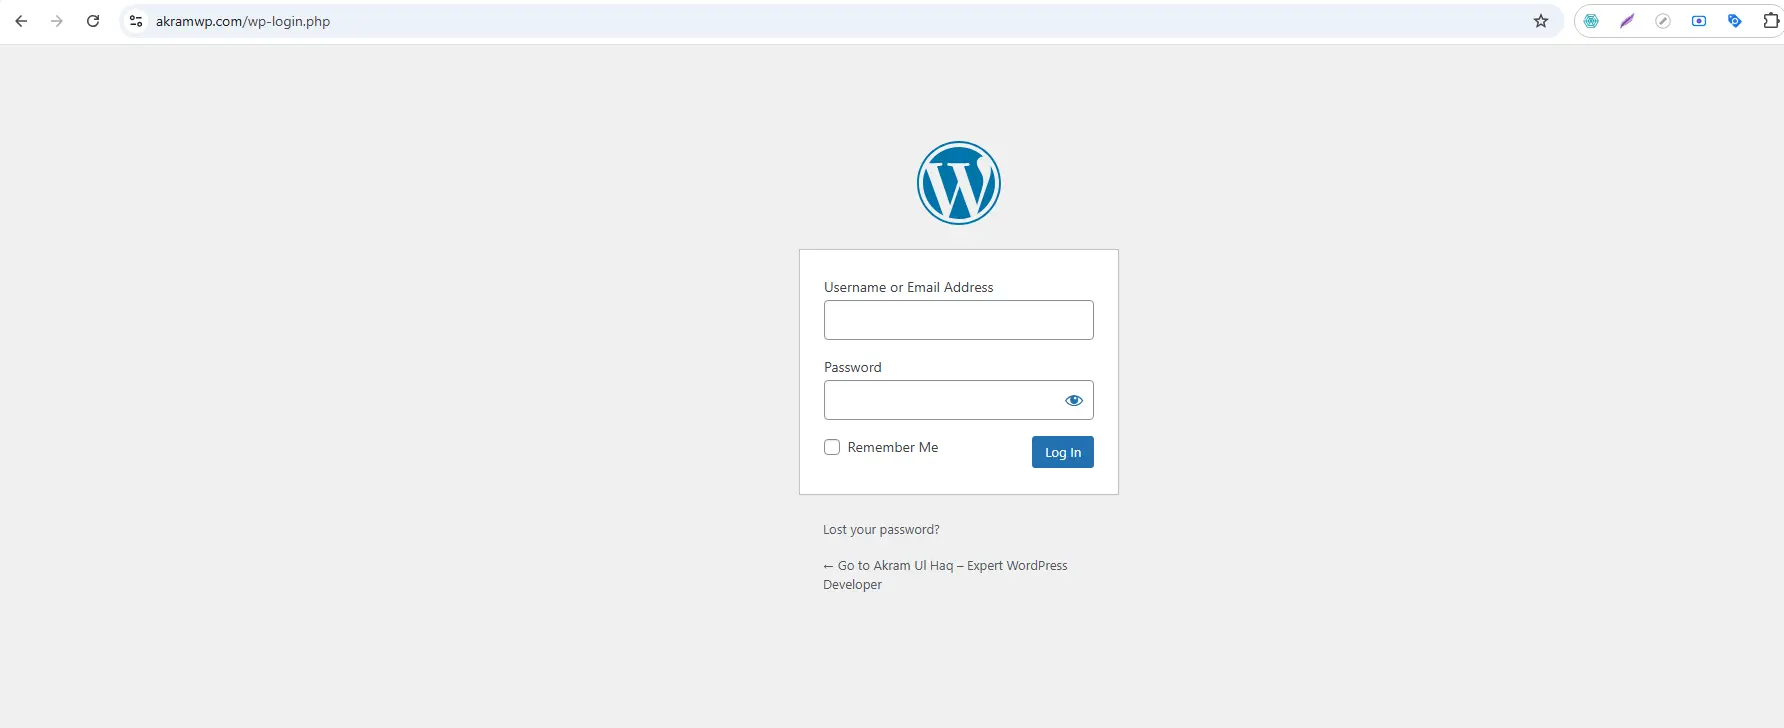
The Login Screen
You’ll see the familiar WordPress login screen with:
-
Username or Email field
-
Password field
-
“Remember Me” checkbox
-
Lost your password? link
Pro Tip: Bookmark your login page immediately. You’ll visit it almost daily.
Security Note
The standard /wp-admin URL is well-known to hackers. While we won’t cover security plugins in depth here, know that you should:
-
Use strong passwords (mix letters, numbers, symbols)
-
Never use “admin” as your username
-
Consider two-factor authentication once you’re comfortable
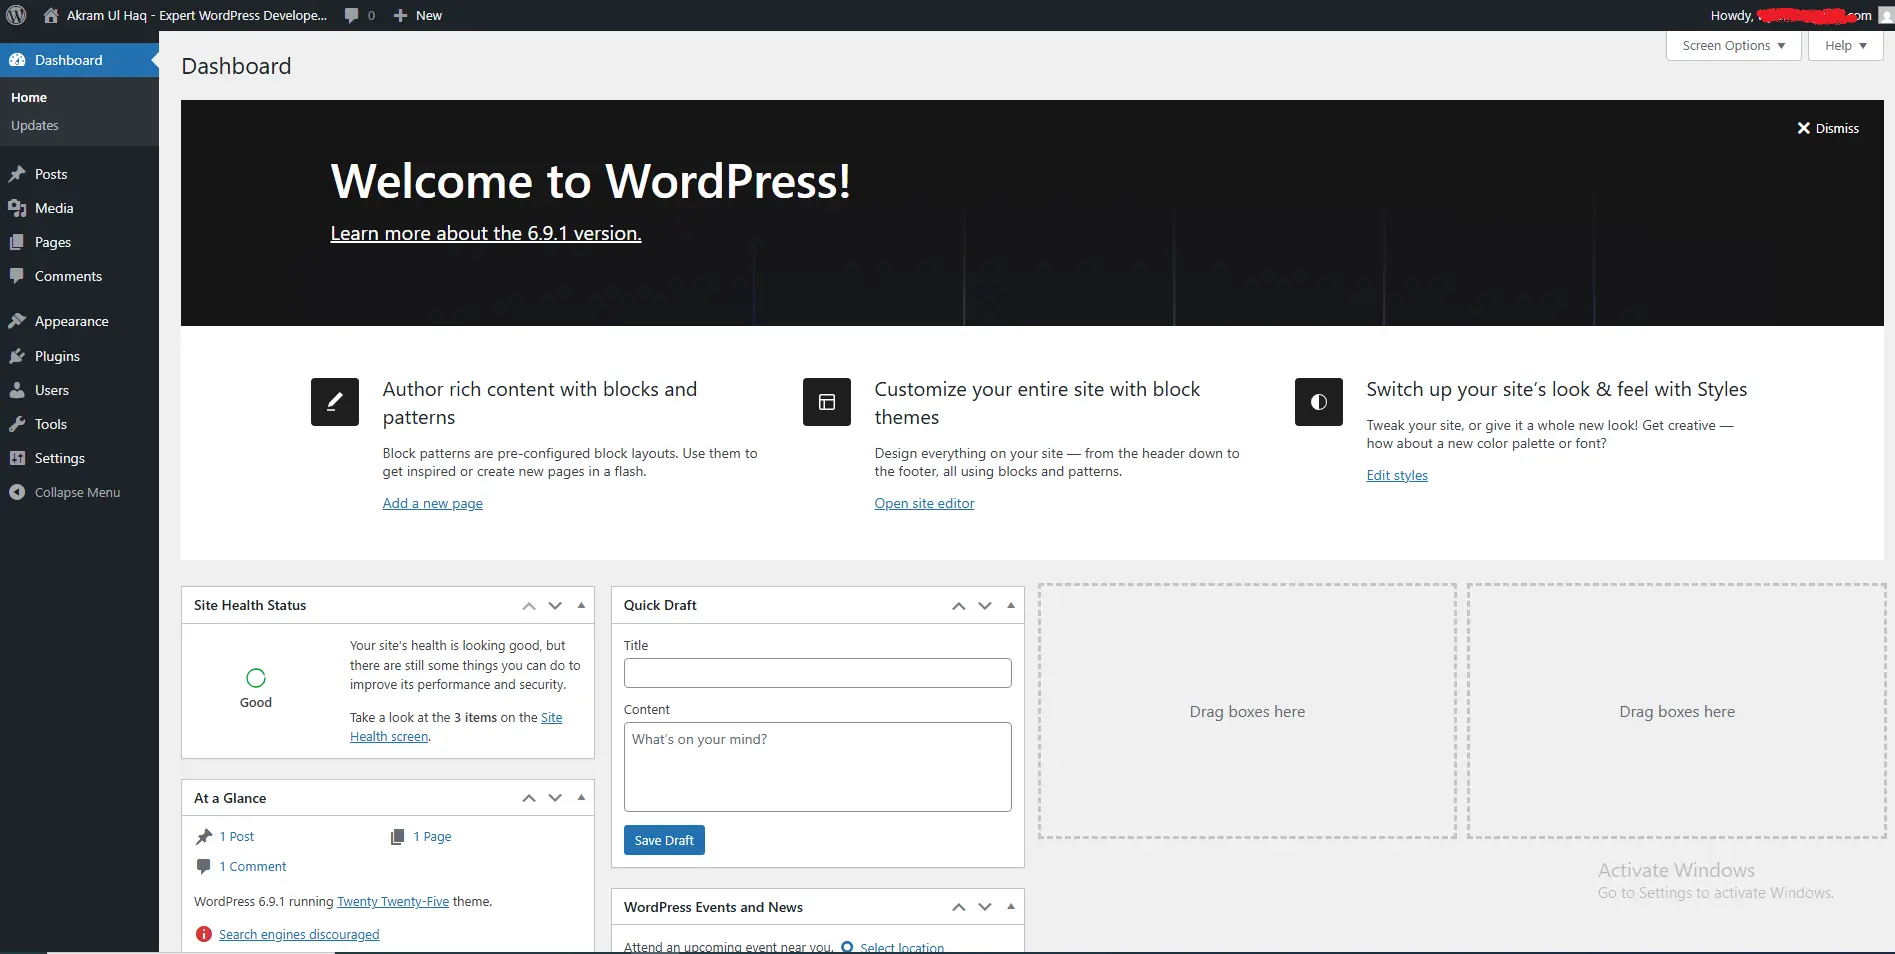
Chapter 2: The Dashboard Home – Your Command Center
Once logged in, the first screen you see is the Dashboard Home. This page serves as your headquarters, displaying important information at a glance.
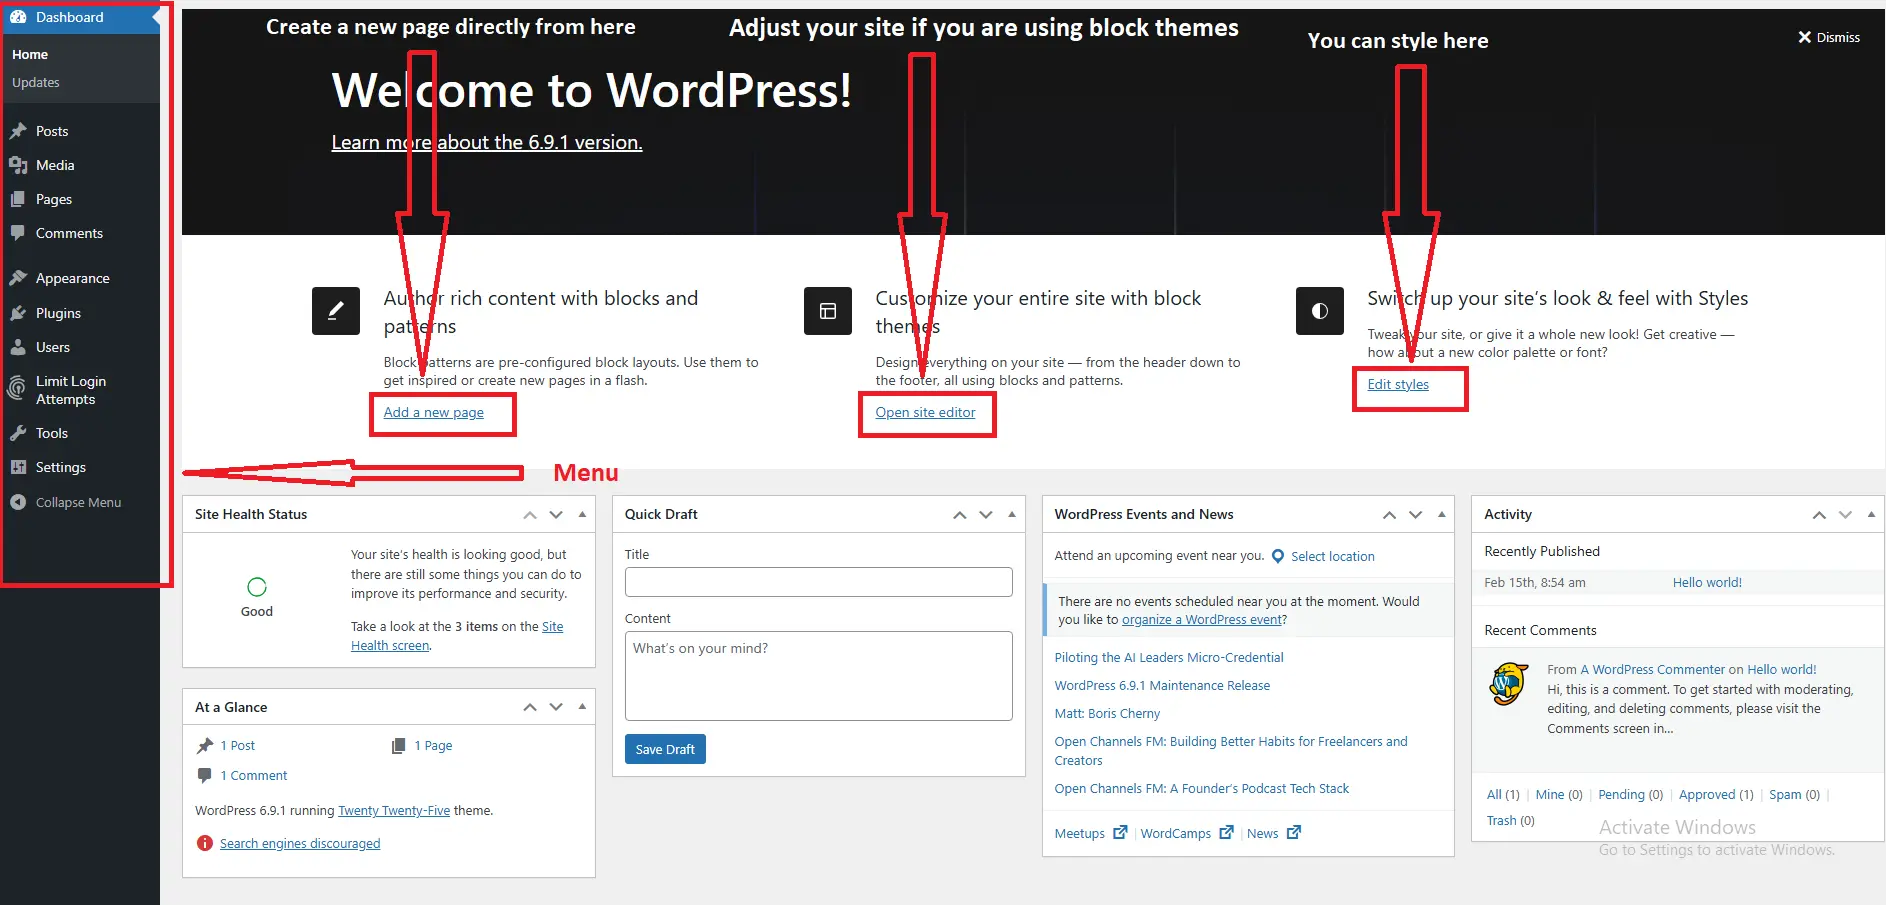
Understanding the Layout
The Left Sidebar (Primary Navigation)
This dark sidebar is your main navigation tool. It remains visible on every dashboard page. We’ll explore each menu item in detail throughout this guide.
The Top Admin Bar
The black bar across the top appears whether you’re in the dashboard or viewing your live site (when logged in). It provides quick access to:
-
Your site name (click to visit the front end)
-
Comments notifications
-
“+ New” shortcuts for posts, pages, media
-
Your profile and logout options
The Main Content Area
This is where the action happens. On the Dashboard Home, you’ll find several information boxes called “widgets.”
Key Dashboard Home Widgets Explained
1. Welcome Widget
A dynamic box that changes based on your WordPress setup. It offers quick links to common tasks like customizing your theme or writing your first post.
2. At a Glance
This widget shows vital statistics:
-
Total posts and pages
-
Number of comments (pending, approved, spam)
-
Current WordPress version
-
Active theme name
3. Activity
Recently published content and incoming comments appear here. You can moderate comments directly from this widget.
4. Quick Draft
This is incredibly useful. Need to jot down a blog post idea quickly? Type a title and some notes here, click “Save Draft,” and it’s saved to your posts. No need to open the full editor.
5. WordPress Events and News
WordPress news and information about local WordPress meetups (customizable in Screen Options).
Customizing Your Dashboard View
Notice the Screen Options tab in the top-right corner? Click it, and a panel slides down showing every widget on the current page. You can:
-
Check/uncheck boxes to show or hide widgets
-
Drag and drop widgets to rearrange them
-
Choose how many items display in lists
This customization works on almost every dashboard page. If you don’t use a feature, hide it and reduce visual clutter.
Chapter 3: Posts – Where Your Blog Lives
The Posts menu is your content creation hub for blog articles, news updates, and timely content.
All Posts
This screen displays every post you’ve ever written in a sortable table showing:
-
Title
-
Author
-
Categories
-
Tags
-
Publication date
-
Comment count
Quick Actions: Hover over any post title to reveal instant links for Edit, Quick Edit, Delete, and View.
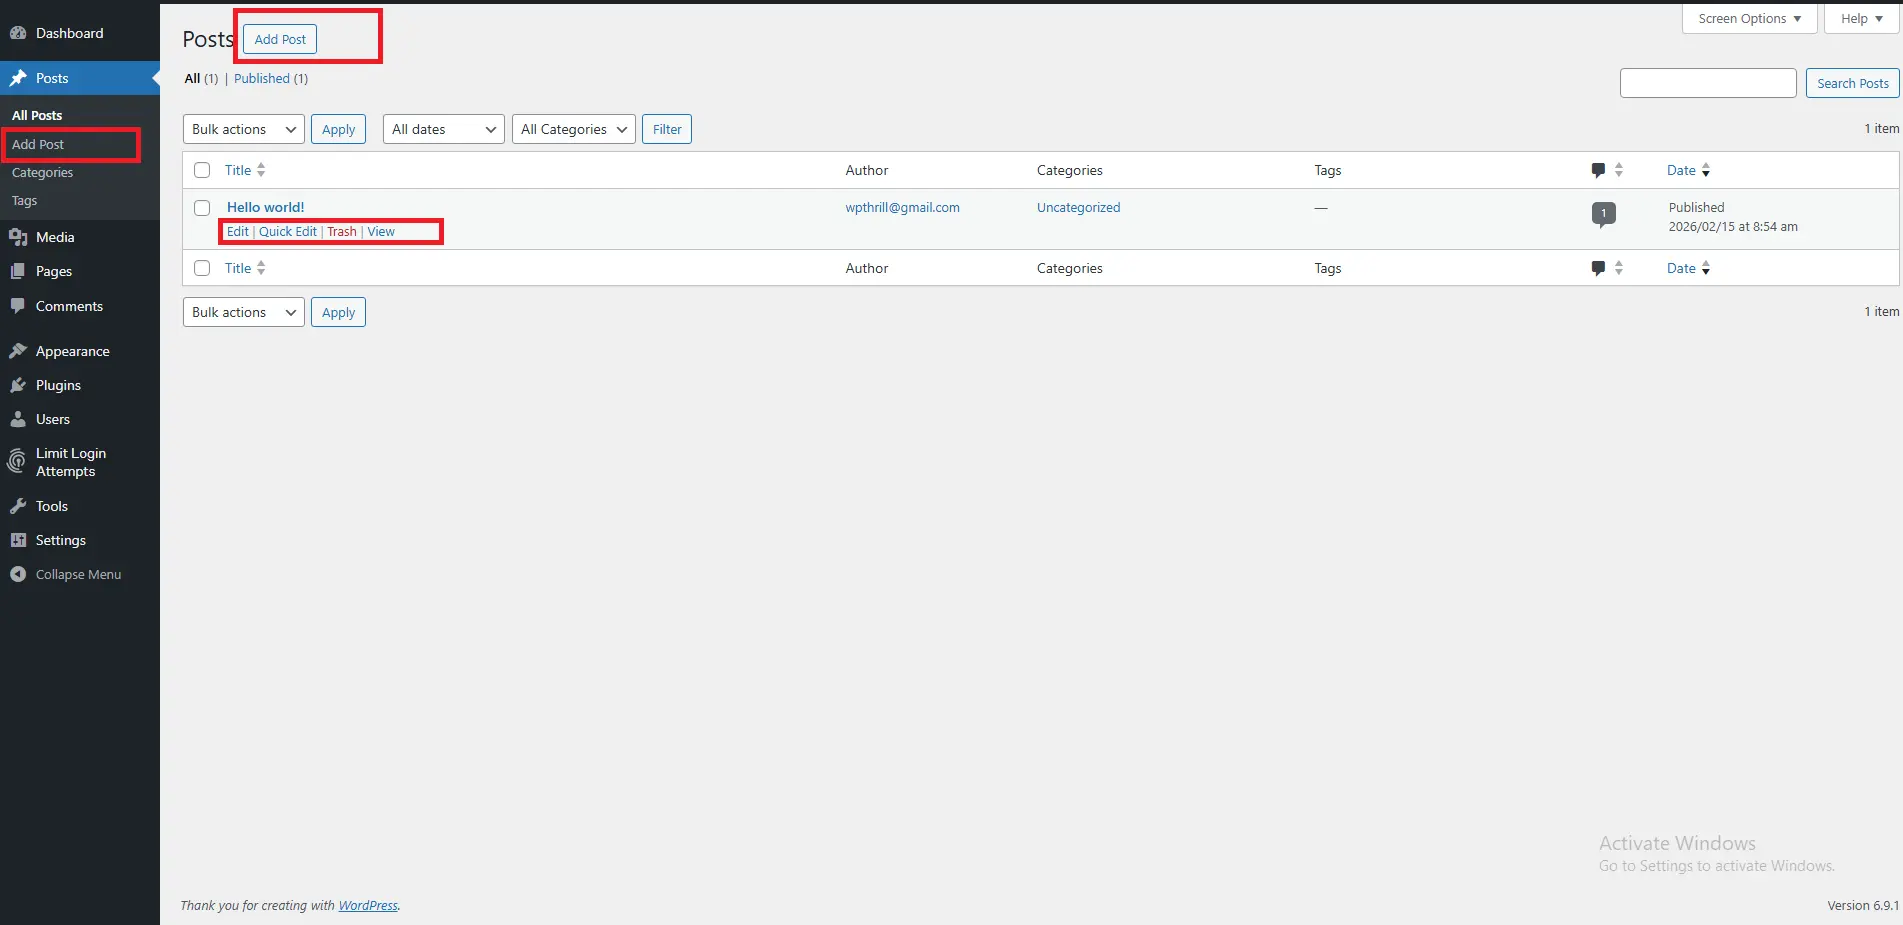
Add New Post
Clicking this opens the WordPress Block Editor (Gutenberg), which we’ll cover in detail in Chapter 8.
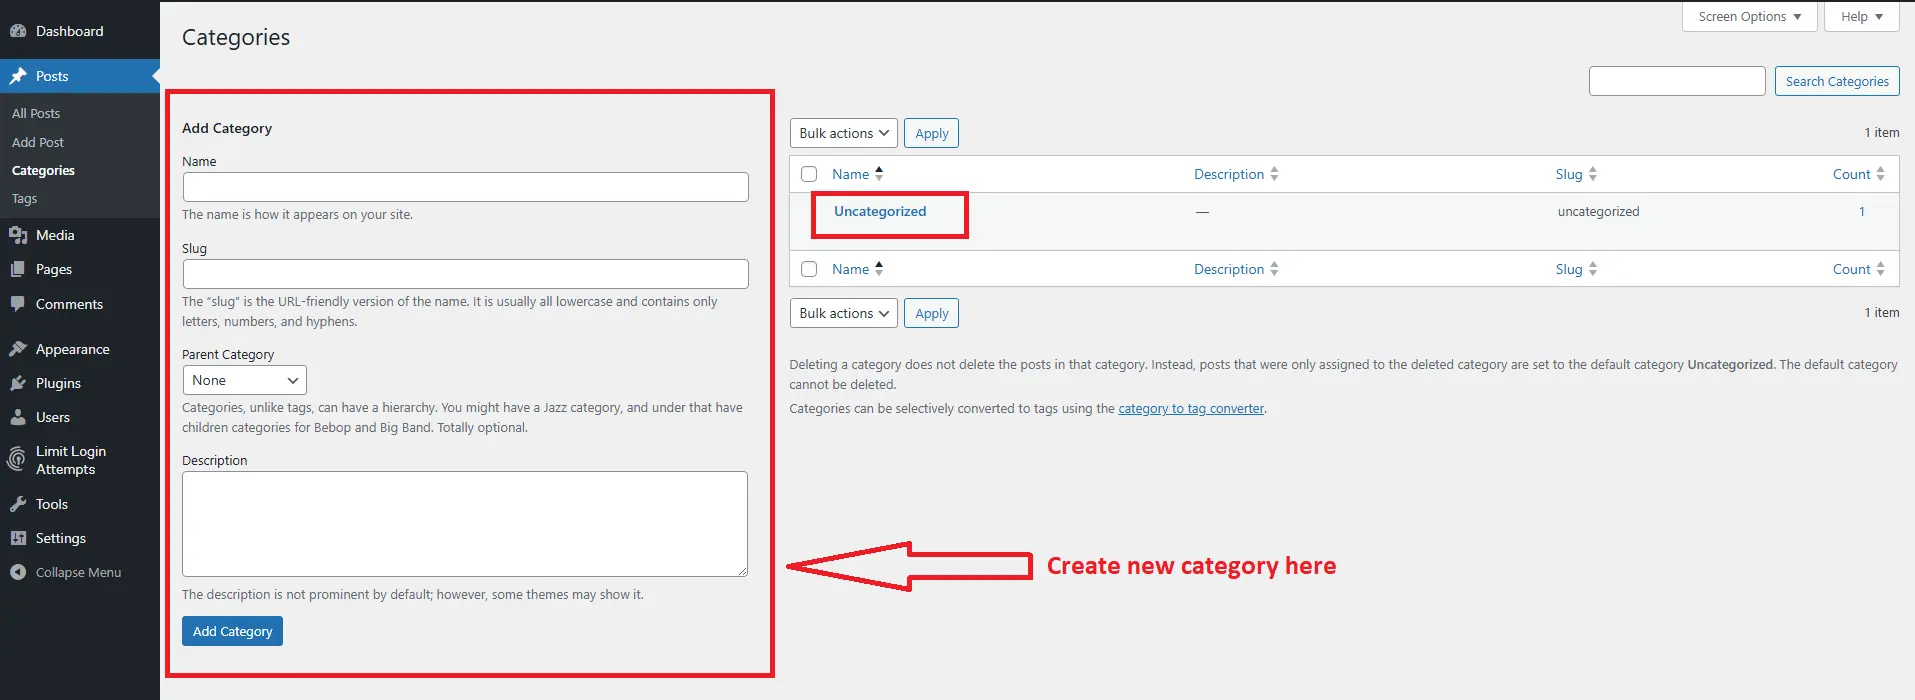
Categories
Categories are your broad content groupings. Think of them as table of contents chapters. For a food blog, categories might be:
-
Appetizers
-
Main Courses
-
Desserts
-
Vegan Recipes
Best Practice: Limit categories to 5-10 maximum. Too many confuse visitors and hurt SEO.
Tags
Tags are micro-categories that describe specific details. Using our food blog example, a “Pasta” post might have tags like:
-
“quick meals”
-
“Italian cuisine”
-
“under 30 minutes”
-
“family-friendly”
Unlike categories, you can have dozens of tags. They help with internal linking and site search.
Post vs. Page: Understanding the Difference
Many beginners confuse posts and pages. Here’s the distinction:
| Feature | Posts | Pages |
|---|---|---|
| Nature | Timely, blog-style | Static, timeless |
| Display | Reverse chronological order | Hierarchical |
| Categories/Tags | Yes | No |
| Author | Displayed | Usually hidden |
| Comments | Usually enabled | Usually disabled |
| Examples | News, articles, recipes | About, Contact, Services |
Chapter 4: Media – Your Digital Asset Library
The Media library stores every image, PDF, video, and audio file you upload to WordPress.
Media Library
This grid or list view shows all your uploaded files. Key features:
-
Search: Find files by name
-
Filter: Show images, documents, or un-attached files
-
Bulk Actions: Delete multiple files at once
-
Edit: Click any file to add captions, alt text, descriptions, or crop/resize images
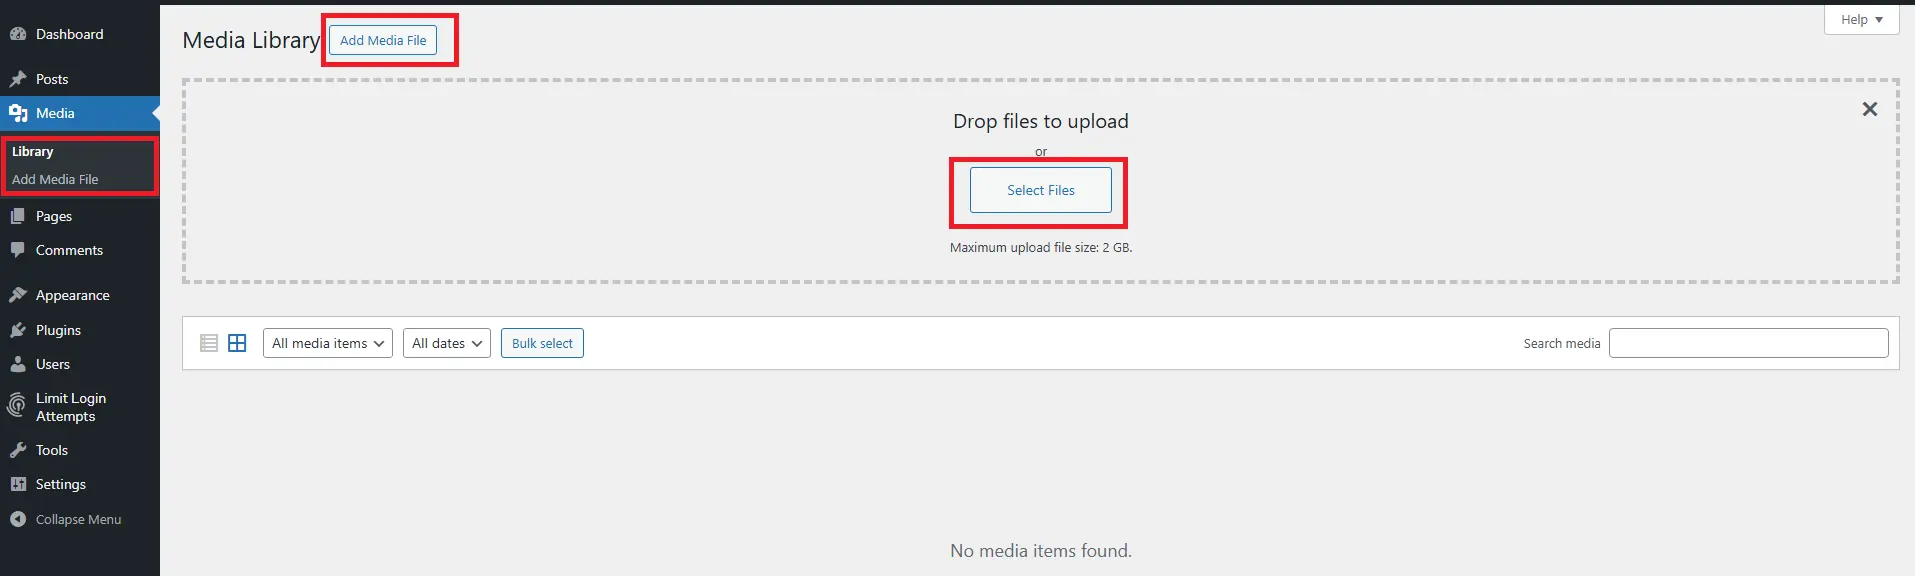
Add New
Upload files by dragging them into the browser or using the file selector.
Critical SEO Tip: Always add descriptive Alt Text to images. Alt text helps search engines understand your images and improves accessibility for visually impaired users using screen readers.
Bad Alt Text: “image1.jpg”
Good Alt Text: “chocolate-chip-cookies-baking-sheet”
File Size Matters
Large images slow down your website. Before uploading:
-
Resize images to maximum display size (usually 2000px width is plenty)
-
Compress using tools like TinyPNG or ShortPixel
-
Use JPEG for photos, PNG for graphics with transparency
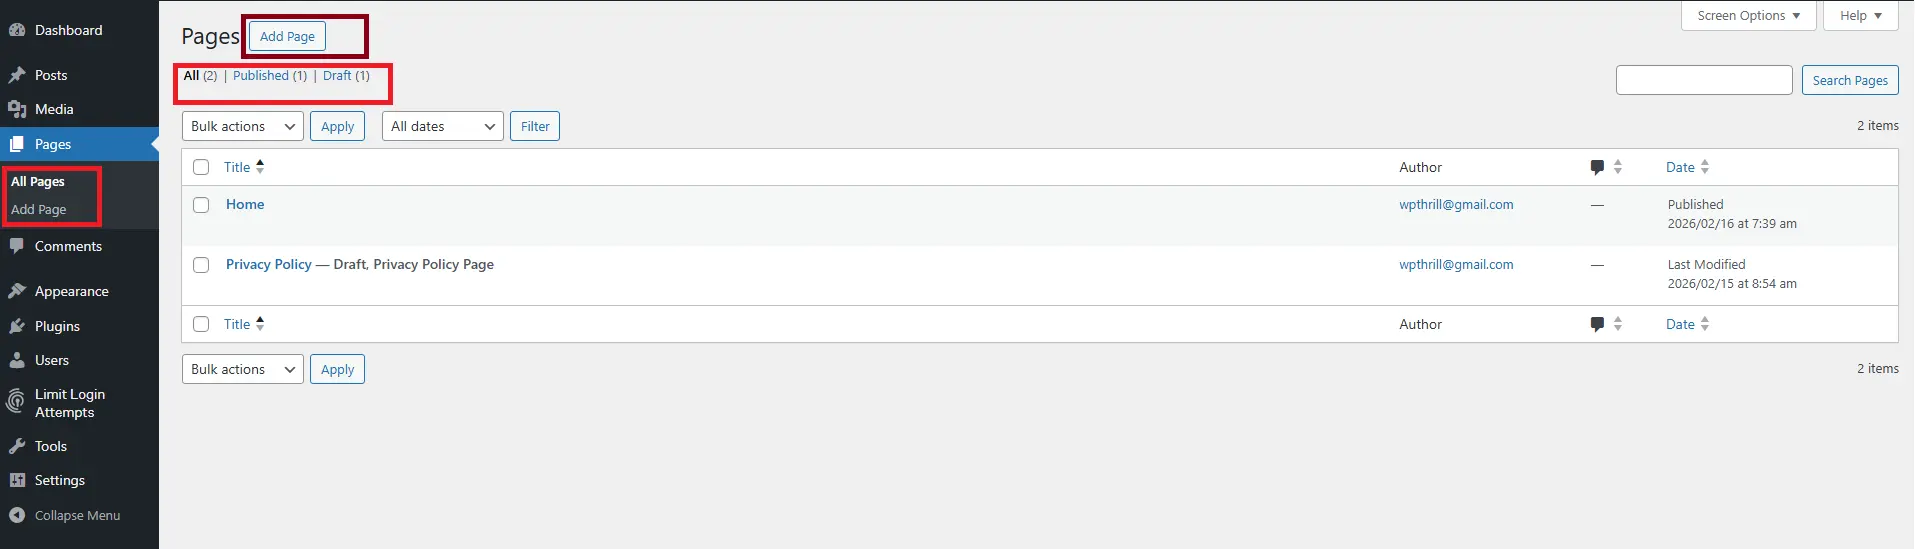
Chapter 5: Pages – Your Static Content Foundation
While posts are dynamic and timely, Pages are the permanent pillars of your website.
All Pages
Similar to the Posts screen, this shows all your static pages. The key difference? Pages can have parent-child relationships.
Page Hierarchy Example:
-
About Us (Parent)
-
Our Team (Child of About Us)
-
Company History (Child of About Us)
-
-
Services (Parent)
-
Web Design (Child of Services)
-
SEO Consulting (Child of Services)
-
This hierarchy creates clean URLs like yoursite.com/about-us/our-team.
Add New Page
The page editor is identical to the post editor (covered in Chapter 8). The main differences are in the settings panel:
-
No categories or tags
-
Page Attributes section for parent/child relationships and template selection
-
Page templates may offer different layouts (full-width, with sidebar, etc.)
Essential Pages Every Website Needs
At minimum, your site should include:
-
Homepage – Your site’s front door
-
About Us – Your story and credibility
-
Contact – Ways to reach you (usually with a contact form)
-
Privacy Policy – Legally required in many jurisdictions
-
Terms of Service – If you sell products or accept user content
Chapter 6: Appearance – Designing Your Site
The Appearance menu controls how your website looks to visitors. This is where design happens.
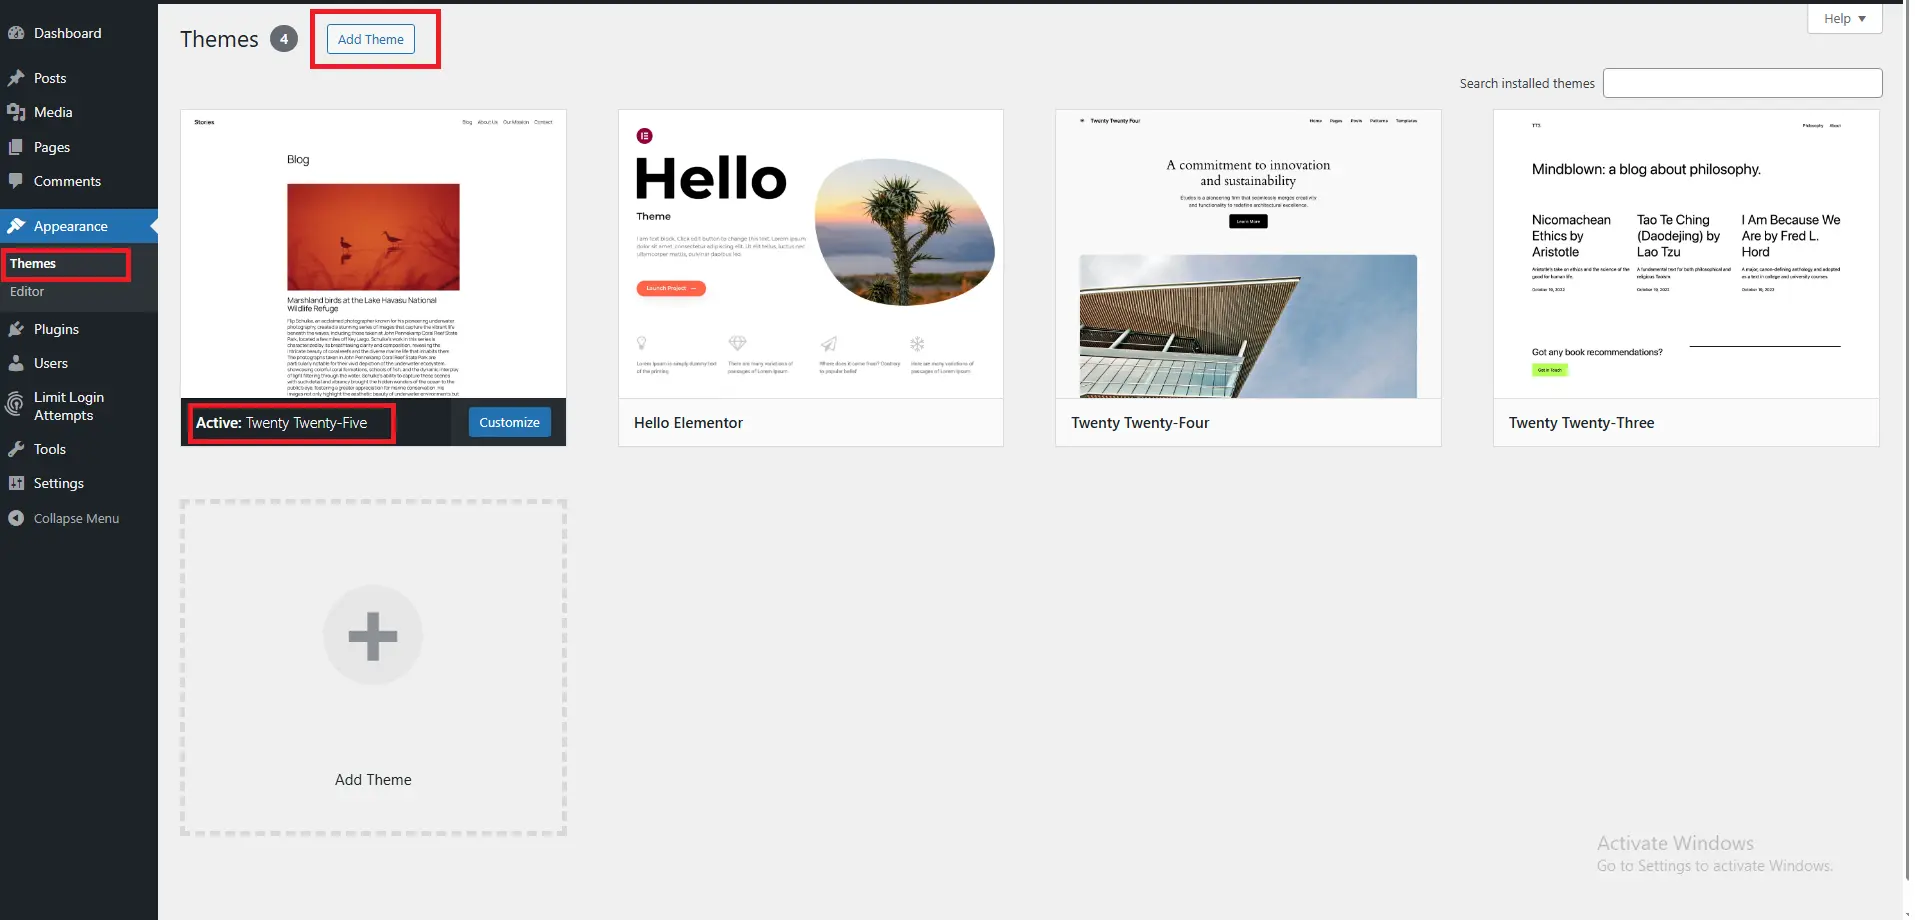
Themes
Themes are pre-designed templates that control your site’s overall look. WordPress comes with default themes, but thousands are available.
-
Active Theme: Your current design
-
Theme Details: Preview any theme before activating
-
Add New: Browse thousands of free themes from the WordPress repository
-
Upload: Install premium themes purchased from third parties
Choosing a Theme: Beginners should look for:
-
Regular updates (within last 2 months)
-
Good ratings (4+ stars)
-
Responsive design (mobile-friendly)
-
Compatibility with popular page builders
Customize
The WordPress Customizer lets you see changes in real-time before publishing. Options vary by theme but typically include:
-
Site Identity (logo, site title, tagline)
-
Colors
-
Header/Footer layouts
-
Background image
-
Additional CSS for custom code
Widgets
Widgets are content blocks you can add to widget-ready areas like sidebars, footers, or special widget zones. Common widgets include:
-
Search bar
-
Recent posts
-
Categories list
-
Calendar
-
Custom HTML
Some modern themes use the Full Site Editing (FSE) approach instead of traditional widgets. We’ll cover that in advanced tutorials.
Menus
Menus control your site’s navigation bars. You can:
-
Create multiple menus (main menu, footer menu, social menu)
-
Add pages, posts, categories, or custom links
-
Arrange items by dragging
-
Create dropdown menus by indenting items
Menu Locations: Your theme defines where menus can appear. Common locations:
-
Primary Menu (usually header)
-
Footer Menu
-
Social Links Menu
Theme File Editor
Warning: This area allows direct editing of theme code. One wrong character can break your site. Beginners should never use this unless guided by a developer.
Chapter 7: Plugins – Adding Functionality
If WordPress themes control design, Plugins control functionality. Plugins are like apps for your website, adding features WordPress doesn’t include by default.
Installed Plugins
This screen shows every plugin on your site with their current status:
-
Active: Working and affecting your site
-
Inactive: Installed but not running
-
Update Available: New version ready
Key actions:
-
Activate/Deactivate: Turn features on/off
-
Delete: Remove permanently
-
Settings: Quick link to plugin configuration (if available)

Add New Plugin
The WordPress Plugin Directory contains over 60,000 free plugins. You can:
-
Search by keyword
-
Filter by featured, popular, recommended, or favorites
-
Upload premium plugins purchased elsewhere
Essential Plugins for Beginners:
-
Yoast SEO or Rank Math – Search engine optimization
-
Wordfence or Sucuri – Security
-
UpdraftPlus – Backups
-
Contact Form 7 or WPForms – Contact forms
-
W3 Total Cache or WP Rocket – Speed optimization
The Golden Rule of Plugins
Only install what you actually need. Every plugin adds code that can:
-
Slow down your site
-
Create security vulnerabilities
-
Cause conflicts with other plugins
Start minimal, add only when necessary.
Chapter 8: The Block Editor – Creating Content
When you click “Add New Post” or “Add New Page,” you enter the WordPress Block Editor (officially called Gutenberg). This is where content creation happens.
What Are Blocks?
Everything in the new editor is a block. Want text? Add a paragraph block. Want an image? Add an image block. Want a button? Add a button block.
This modular approach makes page building intuitive and flexible.
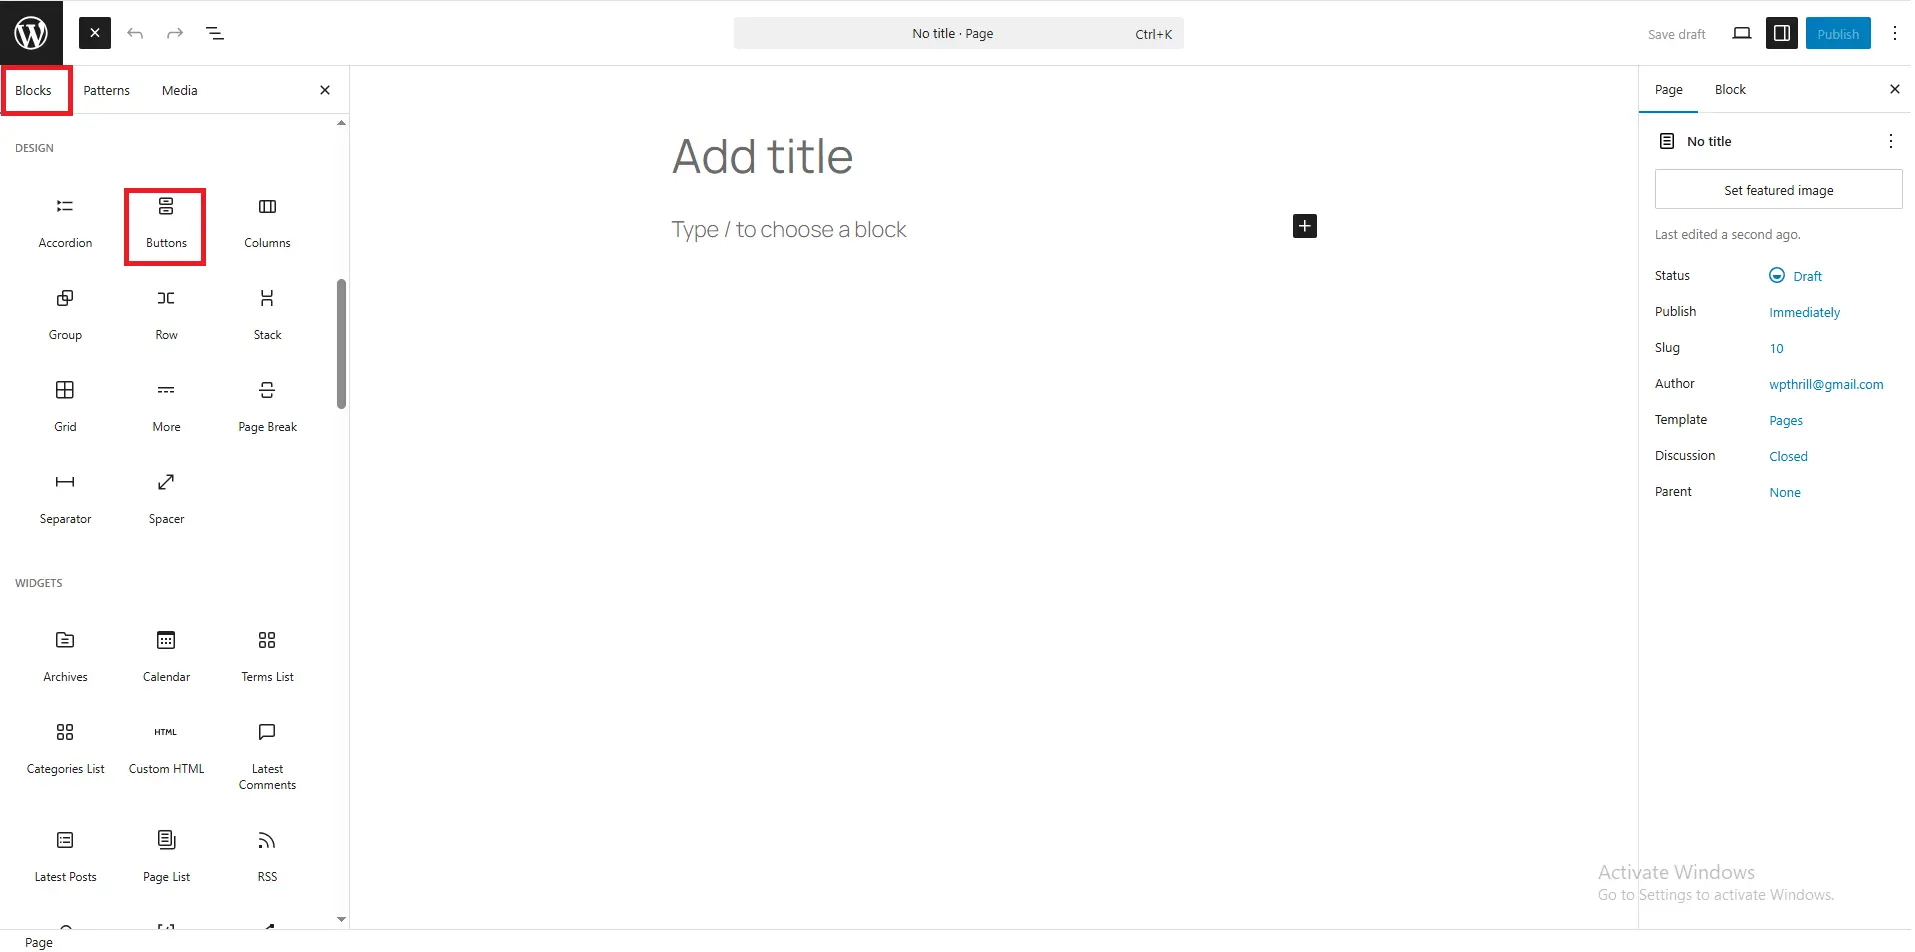
The Editor Interface
Left Side (Content Area):
-
Your actual content
-
Click the + icon to add new blocks
-
Hover blocks to see settings
-
Drag blocks to rearrange
Right Side (Settings Panel):
Two tabs control different aspects:
Document Tab:
-
Status & visibility (public, private, password-protected)
-
Publish date
-
Permalink (URL slug)
-
Featured image
-
Excerpt (post summary)
-
Discussion settings
-
Categories and tags (posts only)
Block Tab:
-
Settings for the currently selected block
-
Typography (size, font family)
-
Color settings
-
Spacing (padding, margins)
-
Advanced CSS classes
Block Types You’ll Use Most
Common Blocks:
-
Paragraph – Standard text
-
Heading – Section titles (H1-H6)
-
Image – Single images
-
Gallery – Multiple images in a grid
-
List – Bulleted or numbered lists
-
Quote – Pull quotes and blockquotes
-
Buttons – Clickable call-to-action buttons
-
Columns – Multi-column layouts
-
Spacer – Add white space
-
Separator – Horizontal dividing line
Embed Blocks:
-
YouTube – Paste URL for embedded video
-
Twitter – Embed tweets
-
Spotify – Add music players
-
Instagram – Embed posts
-
GitHub, TikTok, and dozens more
Layout Blocks:
-
Group – Bundle blocks together
-
Columns – Create complex layouts
-
Media & Text – Side-by-side images and text
-
Cover – Text overlaid on background image
Keyboard Shortcuts (Speed Up Your Work)
| Action | Windows | Mac |
|---|---|---|
| Save draft | Ctrl + S | Cmd + S |
| Undo | Ctrl + Z | Cmd + Z |
| Redo | Ctrl + Shift + Z | Cmd + Shift + Z |
| Add new block | Enter at end | Enter at end |
| Duplicate block | Ctrl + Shift + D | Cmd + Shift + D |
| Remove block | Shift + Alt + Z | Shift + Option + Z |
Chapter 9: Users – Managing Access
If you’re building a site alone, Users might seem unimportant now. But understanding user roles is crucial for security and collaboration.
Your Profile
Update your personal information:
-
Name (how it displays publicly)
-
Email (important for password resets)
-
Password (change regularly)
-
Biography
-
Profile picture (via Gravatar)
All Users
See everyone registered on your site. Click any username to edit their profile or change permissions.
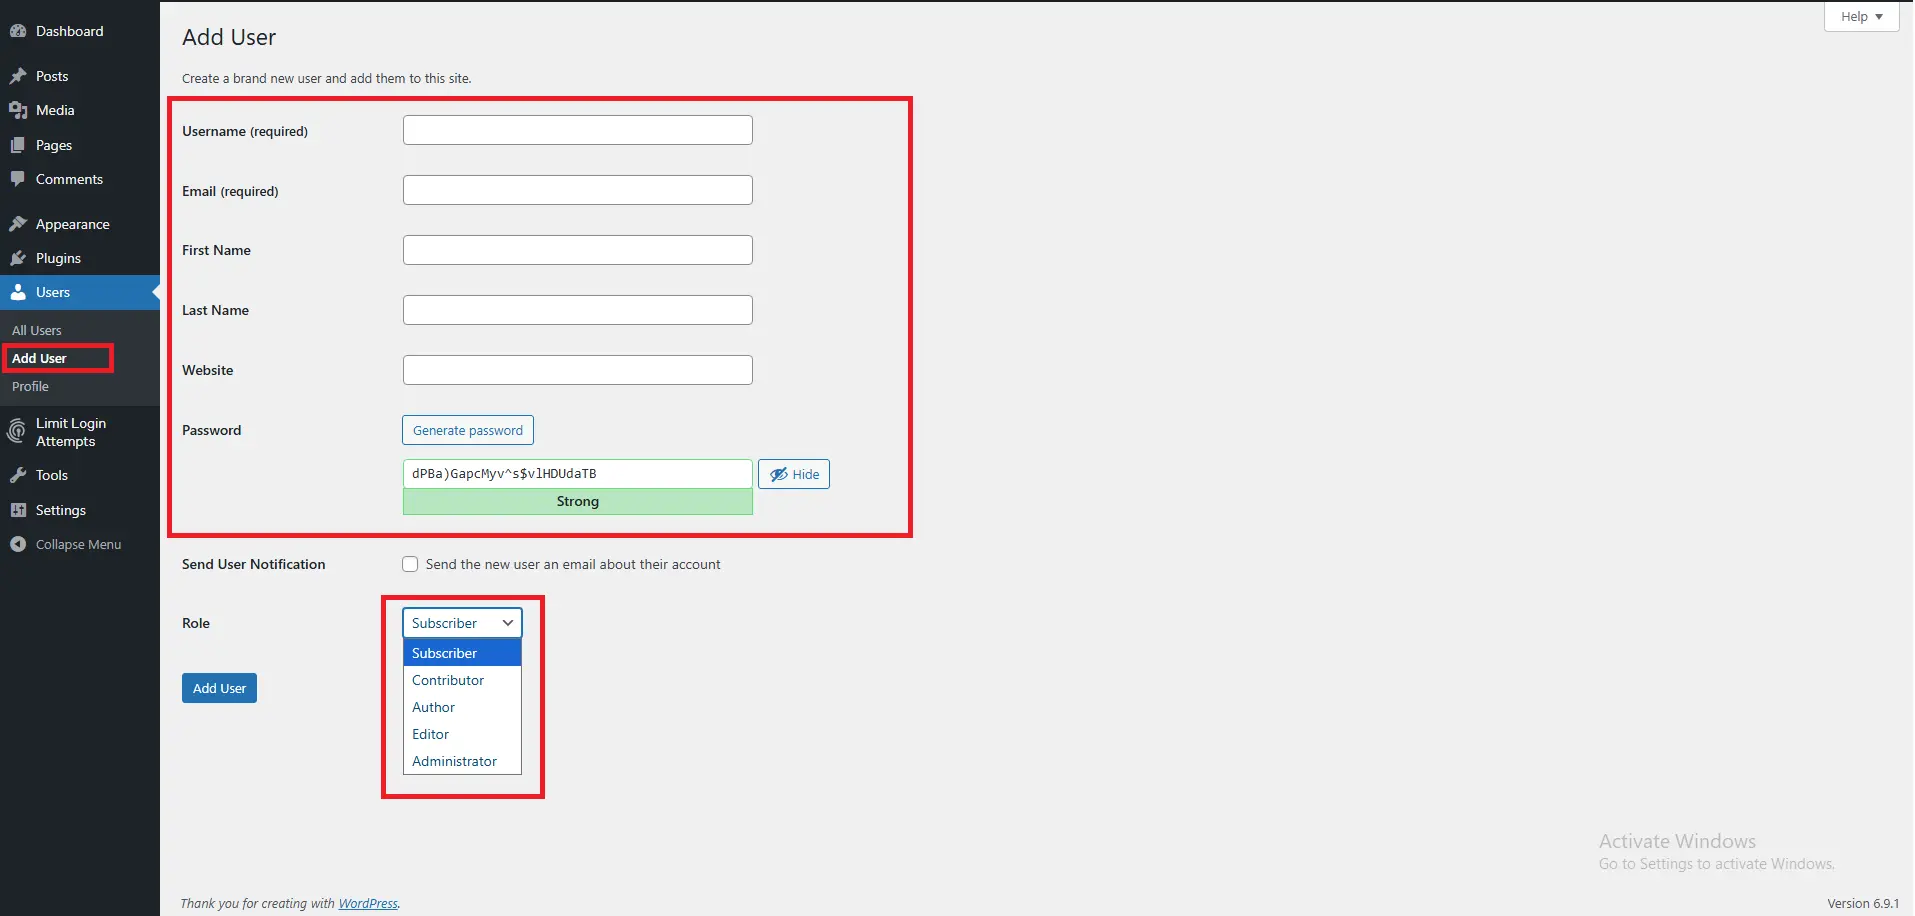
User Roles Explained
WordPress has six predefined roles with different capabilities:
1. Super Admin (Multisite only)
Network-wide control over multiple WordPress sites.
2. Administrator
Full access to everything on a single site. You can:
-
Install plugins and themes
-
Create and edit any content
-
Manage users
-
Change settings
-
Delete everything
3. Editor
Full control over content but no access to site settings. Editors can:
-
Create, edit, publish, and delete any posts/pages
-
Moderate comments
-
Manage categories and tags
-
Cannot install plugins or change themes
4. Author
Can create and publish their own posts but cannot touch others’ content. Perfect for regular contributors you trust.
5. Contributor
Can write and edit their own posts but cannot publish them. Posts must be reviewed and published by an Editor or Administrator.
6. Subscriber
Can only manage their own profile. Usually used for membership sites or comment management.
Adding New Users
When your site grows, you’ll add team members. Always assign the lowest permission level needed for their job. An intern writing posts should be an Author, not an Administrator.
Chapter 10: Tools & Settings – The Technical Stuff
These menus control behind-the-scenes configuration. You won’t visit them daily, but they’re important to understand.
Tools
-
Available Tools: Simple tools like Categories/Tags converter (rarely used)
-
Import: Bring content from other platforms (Blogger, Tumblr, RSS)
-
Export: Download your content as XML files (backup or migration)
-
Site Health: WordPress’s built-in diagnostic tool checking performance and security
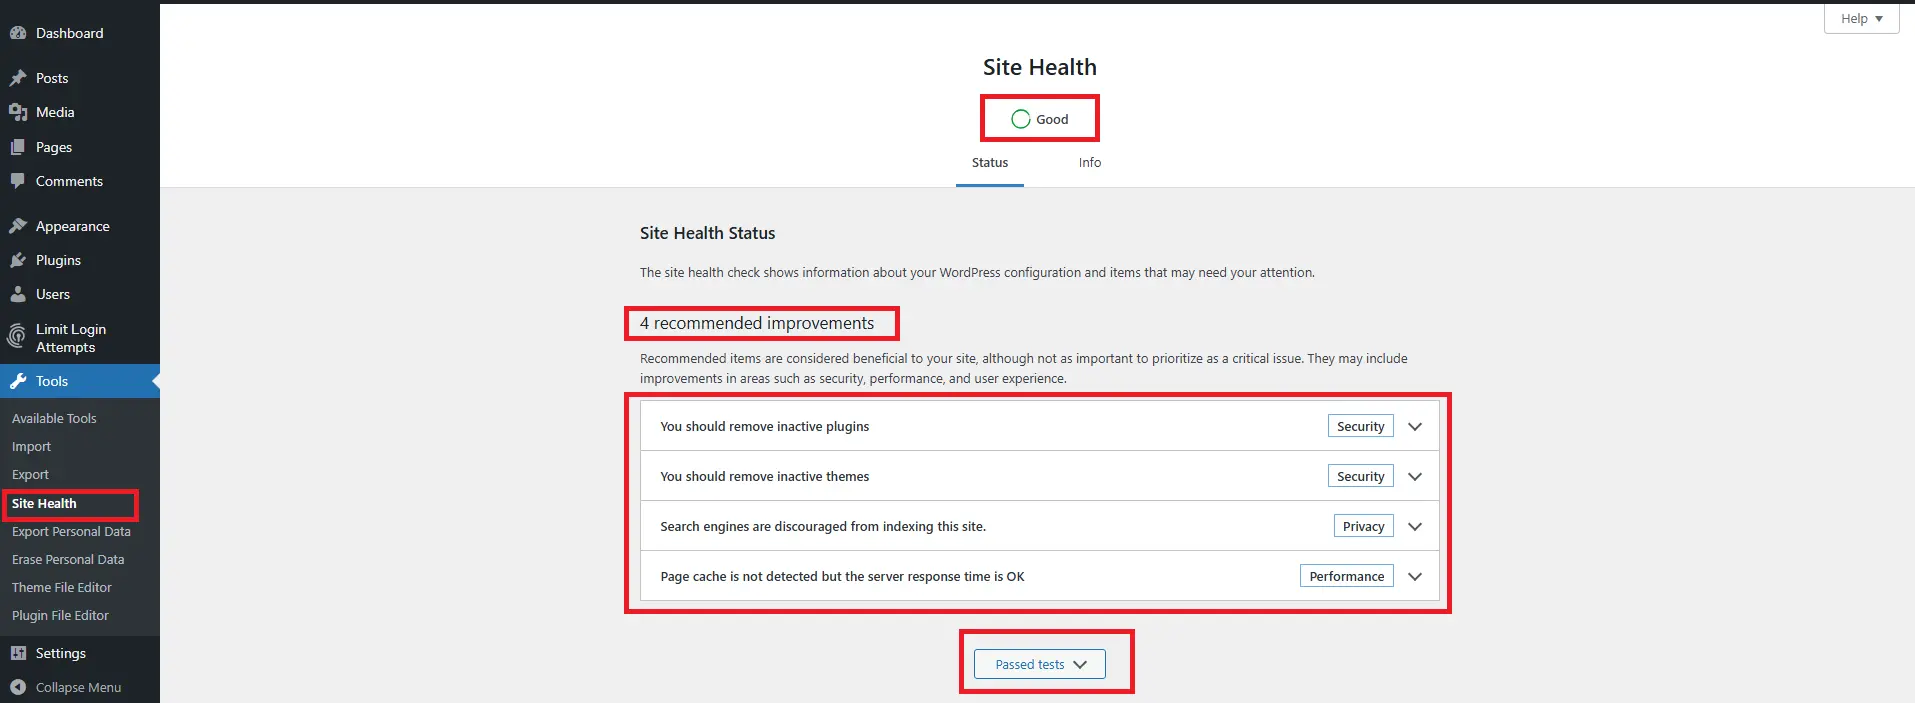
Site Health is Your Friend: Check this monthly. It flags issues like outdated PHP versions or plugins with security concerns.
Settings (The Main Configuration)
General
-
Site Title (appears in search engines and browser tabs)
-
Tagline (brief description)
-
WordPress Address (site URL)
-
Site Address (often same as above)
-
Email address (for admin notifications)
-
Timezone (critical for scheduled posts)
-
Date/Time format
Writing
-
Default post category
-
Default post format
-
Post via email (advanced)
Reading
-
Your homepage displays: Your latest posts OR a static page
-
Front page: Choose static homepage
-
Posts page: Choose page for blog listing
-
Search engine visibility (Discourage search engines? Leave UNCHECKED unless staging)
Discussion
Control comment behavior:
-
Require manual approval
-
Close comments after X days
-
Email notifications
-
Avatar settings
Media
Set default image sizes WordPress creates when you upload. Unless you have specific needs, defaults work fine.
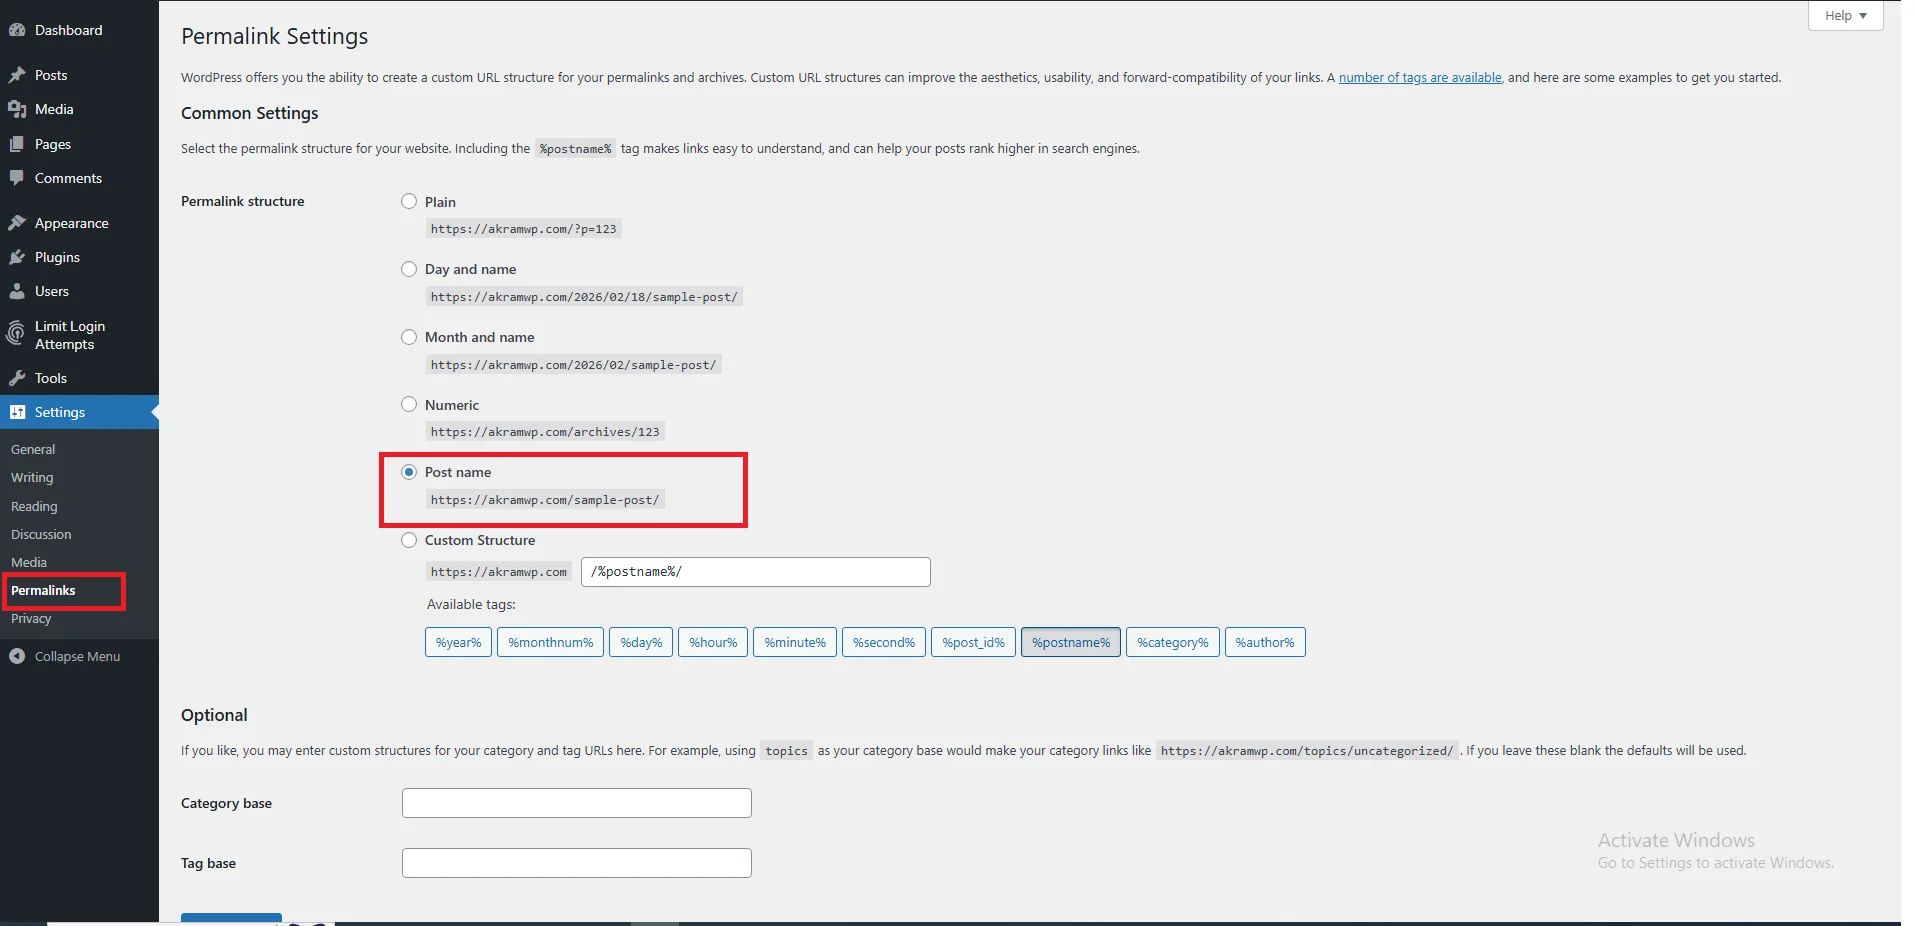
Permalinks
Critical for SEO: Change from the ugly default (?p=123) to something readable.
Recommended Setting: Post name
Your URLs become: yoursite.com/sample-post/
This helps search engines and users understand your content before clicking.
Chapter 11: Hidden Gems – Features Beginners Miss
Even experienced users overlook these dashboard features.
Screen Options (Revisited)
This tab appears on almost every screen. It lets you:
-
Show/hide columns in list views
-
Choose how many items display per page
-
Enable/disable editor features
Help Tab
Next to Screen Options, the Help tab provides context-sensitive documentation for whatever screen you’re viewing. WordPress’s official documentation is excellent.
Collapse Menu
At the very bottom of the left sidebar, a small arrow collapses the menu to icons only, giving you more screen space for content.
Keyboard Shortcuts for Comments
On the Comments screen, use:
-
J – Next comment
-
K – Previous comment
-
A – Approve
-
S – Mark as spam
-
D – Delete
Distraction-Free Writing
In the block editor, click the three dots in the top-right corner and select “Fullscreen mode” to hide everything except your content.
Chapter 12: Common Dashboard Mistakes (And How to Avoid Them)
Learn from others’ errors. Here are the most frequent beginner mistakes:
Mistake 1: Ignoring Updates
When you see the update bubble (red circle with number) on the dashboard menu, update promptly. Outdated software is the #1 security vulnerability.
Before updating: Backup your site. Most hosts offer automatic backups, or use a backup plugin.
Mistake 2: Installing Too Many Plugins
I once saw a beginner with 47 active plugins. His site took 30 seconds to load. Only install what you truly need.
Mistake 3: Using “Admin” Username
The username “admin” is the first thing hackers try. If your admin is still “admin,” create a new administrator user with a unique name, then delete the old “admin” account.
Mistake 4: Never Logging Out
If you use a public computer or shared device, always log out. Your logged-in session gives full access to your site.
Mistake 5: Ignoring Alt Text
Skipping alt text on images hurts your SEO and accessibility. Make it a habit to add descriptive alt text for every image.
Mistake 6: Publishing Without Previewing
Always click “Preview” before “Publish.” What looks good in the editor sometimes breaks on the live site.
Chapter 13: Dashboard Maintenance Checklist
Use this monthly checklist to keep your dashboard (and site) healthy:
Weekly Tasks
-
Moderate pending comments
-
Check for WordPress updates
-
Review plugin updates
Monthly Tasks
-
Run Site Health check
-
Delete unused plugins and themes
-
Empty trash (posts, pages, media)
-
Backup your database and files
-
Review user accounts (remove old users)
Quarterly Tasks
-
Test your contact forms
-
Review analytics for traffic trends
-
Update copyright year in footer
-
Check all external links
Frequently Asked Questions (FAQ)
What is the WordPress Dashboard?
The WordPress Dashboard is the backend control panel (wp-admin) of your website, where you can manage content, plugins, themes, users, and site settings.
How do I log in to my WordPress site?
Add /wp-admin or /wp-login.php to your domain (e.g., https://yoursite.com/wp-admin) to access the login page.
What’s the difference between posts and pages?
Posts are timely blog content organized by categories and tags, while Pages are static content like About or Contact pages, often used for long-term information.
Which user role should I use for my site?
Administrators have full access and control, Editors manage content, Authors write posts, and Subscribers have minimal access. Choose based on the user’s responsibilities.
Do I need plugins?
Yes, but only install what you need. Essential plugins include SEO (Yoast or Rank Math), Security (Wordfence), Backup (UpdraftPlus), Forms (WPForms), and Caching (WP Rocket).
What are WordPress blocks?
Blocks are content elements in the WordPress Block Editor (Gutenberg). Examples include paragraphs, images, buttons, columns, and embeds.
How can I customize my WordPress dashboard view?
Click the “Screen Options” tab in the top-right corner of the dashboard to show or hide widgets and rearrange them as needed.
Conclusion: Your Dashboard Journey Starts Now
Congratulations! You’ve completed the most comprehensive tour of the WordPress dashboard available anywhere.
Remember these key takeaways:
-
The sidebar is your navigation – Everything starts from those left menu items
-
Screen Options customizes your view – Hide what you don’t need
-
Posts are for blogs, Pages are for static content – Never confuse them again
-
Plugins add features, themes control design – Choose both carefully
-
Preview before publishing – Always check your work
-
Keep everything updated – Security and stability depend on it
The WordPress dashboard is like a powerful toolbox. Right now, you know where every tool hangs on the wall. As you build your site, you’ll develop preferences and workflows that make you faster and more efficient.
Don’t be afraid to explore. Click menus you haven’t tried. Open settings you don’t understand (just don’t save changes if you’re unsure). The best way to learn WordPress is by using WordPress.
Your Next Steps:
-
Bookmark this guide for reference
-
Log into your dashboard and identify each section we covered
-
Write your first post using blocks
-
Install your first essential plugin
Welcome to the WordPress community. You’re now equipped to build something amazing.
Next Tutorial: Posts vs Pages in WordPress – What’s the Difference?
Previous Tutorial: How to Login to WordPress Admin (wp-admin)