Custom post types are the backbone of any serious WordPress development project. They transform WordPress from a simple blogging platform into a full-featured content management system.
Want to build a portfolio? You need a “Portfolio” post type.
Building a real estate site? You need a “Properties” post type.
Creating an event calendar? You need an “Events” post type.
If you haven’t created your main plugin file yet, make sure to read my step-by-step guide on how to create a WordPress plugin main file and understand the plugin header properly before continuing.
Here’s the truth: If you can’t create custom post types, you can’t call yourself a WordPress developer. It’s that fundamental.
In this tutorial, you’ll master register_post_type()—the WordPress function that makes all of this possible. You’ll build a complete “Portfolio” post type with featured images, custom URLs, and Gutenberg support.
And you’ll do it inside your plugin, following WordPress coding standards and best practices.
What We’re Building Today
Remember our WP Creative Portfolio Pro plugin? Today we’re adding the core data structure:
wp-creative-portfolio-pro/
├── wp-creative-portfolio.php (already done)
├── includes/
│   ├── class-wp-creative-portfolio.php (← YOU ARE HERE)
│   └── class-wp-creative-portfolio-settings.php (future)
├── assets/
└── languages/
By the end of this tutorial, you’ll have:
✅ A fully functional “Portfolio” custom post type
✅ Featured image support for portfolio items
✅ Custom URL structure (yoursite.com/portfolio/project-name/)
✅ Gutenberg block editor compatibility
✅ Admin menu with portfolio icon
[IMAGE PLACEHOLDER: WordPress admin showing Portfolio menu item and Add New screen]
Figure 1: Your finished Portfolio custom post type in WordPress admin
What Exactly is a Custom Post Type?
Let’s get technical for a moment.
In WordPress, everything is a “post” under the hood. Regular blog posts are stored in the database as post_type = 'post'. Pages are post_type = 'page'. Attachments are post_type = 'attachment'.
A custom post type is simply a new post_type value that you define. Instead of ‘post’ or ‘page’, your portfolio items will have post_type = 'wp_portfolio'.
This separation gives you:
-
Dedicated admin screens – Portfolio items don’t mix with blog posts
-
Custom URLs – Like
/portfolio/web-design-project/ -
Separate templates – Theme developers can create
single-wp_portfolio.php -
Different capabilities – Control who can edit portfolios vs blog posts
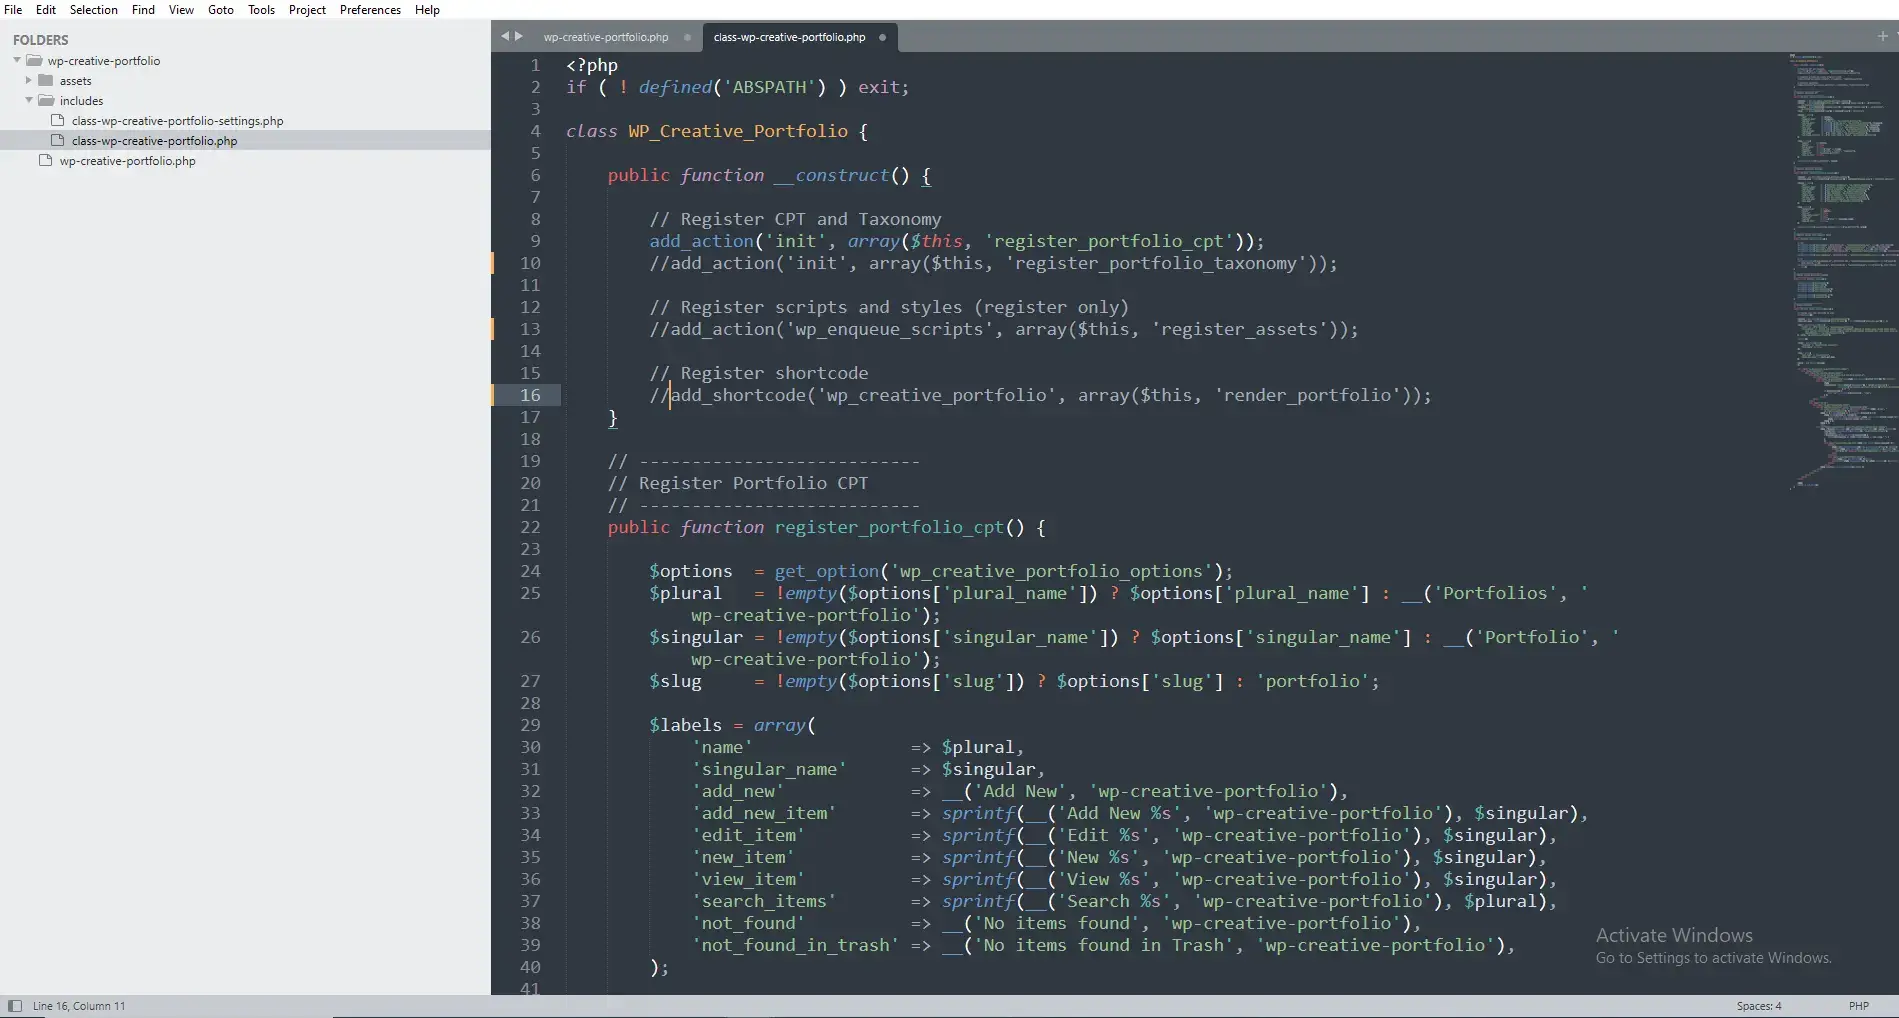
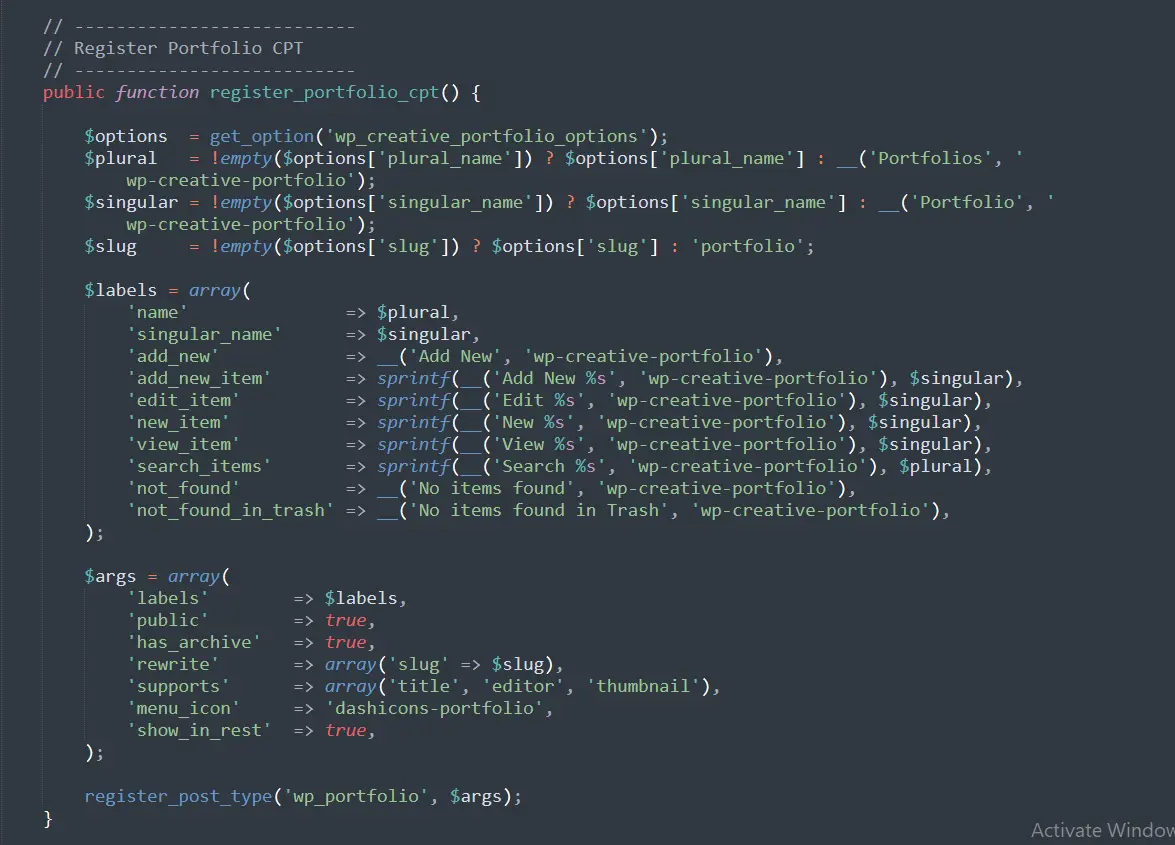
The Complete Custom Post Type Code
Create includes/class-wp-creative-portfolio.php and add this complete code:
<?php
/**
 * Main portfolio functionality class
 *
 * @package WP_Creative_Portfolio
 */

// Prevent direct access
if ( ! defined( 'ABSPATH' ) ) {
    exit;
}

class WP_Creative_Portfolio {

    /**
     * Constructor - hooks into WordPress
     */
    public function __construct() {
        // Register Custom Post Type on WordPress init
        add_action( 'init', array( $this, 'register_portfolio_cpt' ) );

        // We'll add taxonomy registration here in Video/Post 4
        // add_action( 'init', array( $this, 'register_portfolio_taxonomy' ) );

        // We'll add asset registration here in Video/Post 5
        // add_action( 'wp_enqueue_scripts', array( $this, 'register_assets' ) );

        // We'll add shortcode here in Video/Post 6
        // add_shortcode( 'wp_creative_portfolio', array( $this, 'render_portfolio' ) );
    }

    /**
     * Register Portfolio Custom Post Type
     */
    public function register_portfolio_cpt() {

        // Get settings from database (or use defaults)
        $options  = get_option( 'wp_creative_portfolio_options' );
        $plural   = ! empty( $options['plural_name'] ) ? $options['plural_name'] : 'Portfolios';
        $singular = ! empty( $options['singular_name'] ) ? $options['singular_name'] : 'Portfolio';
        $slug     = ! empty( $options['slug'] ) ? $options['slug'] : 'portfolio';

        // Labels control how the post type appears in admin
        $labels = array(
            'name'               => $plural,
            'singular_name'      => $singular,
            'add_new'            => 'Add New',
            'add_new_item'       => 'Add New ' . $singular,
            'edit_item'          => 'Edit ' . $singular,
            'new_item'           => 'New ' . $singular,
            'view_item'          => 'View ' . $singular,
            'search_items'       => 'Search ' . $plural,
            'not_found'          => 'No ' . $plural . ' found',
            'not_found_in_trash' => 'No ' . $plural . ' found in Trash',
            'all_items'          => 'All ' . $plural,
            'menu_name'          => $plural,
            'name_admin_bar'     => $singular,
        );

        // Arguments define how the post type behaves
        $args = array(
            'labels'              => $labels,
            'public'              => true,
            'publicly_queryable'  => true,
            'show_ui'             => true,
            'show_in_menu'        => true,
            'query_var'           => true,
            'rewrite'             => array(
                'slug'       => $slug,
                'with_front' => true,
                'pages'      => true,
                'feeds'      => true,
            ),
            'capability_type'     => 'post',
            'has_archive'         => true,
            'hierarchical'        => false,
            'menu_position'       => 20,
            'menu_icon'           => 'dashicons-portfolio',
            'supports'            => array(
                'title',
                'editor',
                'thumbnail',
                'excerpt',
                'custom-fields',
                'revisions',
            ),
            'show_in_rest'        => true, // Enables Gutenberg
            'rest_base'           => 'portfolio',
            'rest_controller_class' => 'WP_REST_Posts_Controller',
        );

        // Register the post type
        register_post_type( 'wp_portfolio', $args );

        // Optional: Flush rewrite rules on next page load
        // (Handled by activation hook in main file)
    }
}
Deep Dive: Understanding register_post_type()
The register_post_type() function takes two parameters:
-
Post type name –
'wp_portfolio'(must be unique, lowercase, underscores) -
Arguments array – Configuration options
Let’s examine every argument because this is where 90% of developers make mistakes.
The Labels Array (Lines 32-49)
Labels control what users see in the WordPress admin:
$labels = array(
    'name'               => $plural,           // "Portfolios"
    'singular_name'      => $singular,         // "Portfolio"
    'add_new'            => 'Add New',         // Button text
    'add_new_item'       => 'Add New Portfolio', // Page title
    'edit_item'          => 'Edit Portfolio',  // Edit screen title
    'new_item'           => 'New Portfolio',   // New item title
    'view_item'          => 'View Portfolio',  // View link text
    'search_items'       => 'Search Portfolios', // Search button
    'not_found'          => 'No portfolios found', // Empty state
    'not_found_in_trash' => 'No portfolios found in Trash',
    'all_items'          => 'All Portfolios',  // Menu item
    'menu_name'          => $plural,           // Menu display name
    'name_admin_bar'     => $singular,         // Admin bar name
);
Why this matters: Clear labels make your plugin user-friendly. Imagine if “Add New” said “Add New Portfolio” instead of just “Add New”—much clearer!
Pro tip: Notice we’re using $plural and $singular from settings. This lets users customize the names without touching code. We’ll build that settings page in Video/Post 10.
Critical Arguments Explained
public (Line 52)
'public' => true,
Setting this to true automatically enables several features:
-
Visible in admin UI
-
Queryable on frontend
-
Has individual permalinks
-
Included in site searches
Setting it to false hides everything. Useful for internal data.
rewrite (Lines 55-60)
'rewrite' => array(
    'slug'       => $slug,       // URL slug: /portfolio/
    'with_front' => true,        // Respect permalink structure
    'pages'      => true,        // Enable pagination: /portfolio/page/2/
    'feeds'      => true,        // Enable RSS feeds
),
This controls your URL structure. With slug => 'portfolio':
-
Archive:
yoursite.com/portfolio/ -
Single item:
yoursite.com/portfolio/project-name/ -
Category:
yoursite.com/portfolio-category/design/(we’ll add this in Video 4)
has_archive (Line 63)
'has_archive' => true,
Creates an archive page listing all portfolio items. If you set this to a string like 'work', the archive becomes yoursite.com/work/.
menu_icon (Line 67)
'menu_icon' => 'dashicons-portfolio',
Uses WordPress Dashicons. Find all available icons at developer.wordpress.org/resource/dashicons.
Common portfolio icons:
-
dashicons-portfolio -
dashicons-images-alt2 -
dashicons-layout -
dashicons-schedule
supports (Lines 68-75)
'supports' => array(
    'title',        // Project title
    'editor',       // Description/content
    'thumbnail',    // Featured image
    'excerpt',      // Short description
    'custom-fields', // Meta boxes
    'revisions',    // Version history
),
Each support option adds a feature to your post editor:
-
title: Required. Without it, how would you name projects?
-
editor: The main content area. Great for project descriptions.
-
thumbnail: Featured images. Essential for portfolios!
-
excerpt: Short summaries for grid views.
-
custom-fields: For adding metadata like client name, project date.
-
revisions: Tracks changes. Users expect this.
show_in_rest (Line 76)
'show_in_rest' => true,
This single line enables:
-
Gutenberg block editor support
-
REST API access (
/wp-json/wp/v2/portfolio) -
Future block editor features
Without this, your users are stuck with the classic editor.
Why We’re Using a Class
You might wonder why we wrapped everything in a class. Three reasons:
1. Namespace Protection
class WP_Creative_Portfolio {
    public function register_portfolio_cpt() { }
}
Without a class, register_portfolio_cpt() would be a global function. If another plugin uses the same function name, your site crashes.
2. Organization
All portfolio-related methods stay in one place. When you need to fix something, you know exactly where to look.
3. Reusability
You can create multiple instances if needed. Not relevant here, but good practice.
Connecting to the Main Plugin File
Remember our main plugin file includes this class:
require_once WPCP_PLUGIN_DIR . 'includes/class-wp-creative-portfolio.php';
And runs it:
function run_wp_creative_portfolio_pro() {
    new WP_Creative_Portfolio(); // This calls __construct()
}
The constructor hooks register_portfolio_cpt() to init, so WordPress runs it at the right time.
Testing Your Custom Post Type
Follow these steps to verify everything works:
Step 1: Create the Class File
Create includes/class-wp-creative-portfolio.php and add the complete code above.
Step 2: Check for Errors
-
Go to Plugins → Installed Plugins
-
Your plugin should still be active
-
No error messages? Good!
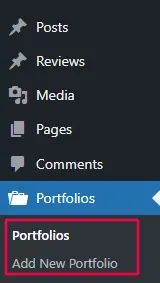
Step 3: Look for the Menu
[IMAGE PLACEHOLDER: WordPress admin menu highlighting the new Portfolio item]
Figure 3: Your Portfolio menu appears in the left admin sidebar
Look in your WordPress admin sidebar. You should see “Portfolios” with a portfolio icon.
Step 4: Create a Portfolio Item
-
Click “Portfolios” → “Add New”
-
Enter a title: “My First Project”
-
Add some description text
-
Set a featured image (Featured Image box in right sidebar)
-
Click “Publish”
Step 5: View on Frontend
-
Visit
yoursite.com/portfolio/my-first-project/ -
You should see your portfolio item
-
Visit
yoursite.com/portfolio/ -
You should see an archive listing
Step 6: Check Gutenberg Compatibility
Edit your portfolio item. If you see the block editor, show_in_rest => true is working!
Common Problems and Solutions
Problem: 404 Error When Viewing Portfolio
Solution: Go to Settings → Permalinks and click “Save Changes”. This flushes rewrite rules manually. Our activation hook should handle this, but manual flush confirms the issue.
Problem: Portfolio Menu Not Showing
Solution: Check these in order:
-
Is the class file included? (Check main plugin file)
-
Is the constructor hooking to
init? -
Any PHP errors? Enable
WP_DEBUG.
Problem: Featured Image Not Showing
Solution: Did you add ‘thumbnail’ to supports array? And did you set a featured image in the post?
Problem: Gutenberg Not Working
Solution: Verify 'show_in_rest' => true is set. Some hosts disable the REST API—check with your hosting provider.
Advanced: Custom Post Type Parameters You Might Need Later
Here are additional arguments you might find useful:
$args = array(
    // ... other args ...

    // Custom capabilities (for user role management)
    'capability_type' => 'portfolio',
    'map_meta_cap'    => true,

    // Exclude from search
    'exclude_from_search' => false,

    // Custom template hierarchy
    'template' => array(
        array( 'core/paragraph', array(
            'placeholder' => 'Add project description...',
        ) ),
    ),

    // Available in navigation menus
    'show_in_nav_menus' => true,

    // Delete with post (for attachments, etc.)
    'delete_with_user' => false,
);
Performance Considerations
Custom post types don’t slow down WordPress. They’re just database entries. However:
-
Register early: Hook to
init(priority 10) is fine -
Don’t query unnecessarily: We’ll use proper
WP_Queryin Video 7 -
Use transients for complex queries: Future optimization
The Settings Connection
Notice we used:
$options = get_option( 'wp_creative_portfolio_options' );
$plural = ! empty( $options['plural_name'] ) ? $options['plural_name'] : 'Portfolios';
This reads from our settings (which don’t exist yet). In Video 10, we’ll build the settings page that lets users change:
-
“Portfolios” to “Projects” or “Work”
-
“Portfolio” to “Project” or “Case Study”
-
URLs from
/portfolio/to/work/
This makes your plugin flexible without coding!
What We’ve Accomplished
Today you:
✅ Created your first WordPress class file
✅ Registered a custom post type with proper labels
✅ Configured URL structure with custom slug
✅ Added featured image support
✅ Enabled Gutenberg compatibility
✅ Connected everything to your main plugin
Your plugin now has a place to store portfolio data. In Video 4, we’ll add categories to organize that data.
Frequently Asked Questions
Can I change the post type name after launching?
Technically yes, but it’s dangerous. Changing ‘wp_portfolio’ to something else loses all existing data. Choose carefully and stick with it.
Why use ‘wp_portfolio’ instead of just ‘portfolio’?
Prefixing with ‘wp_’ reduces chance of conflicts. If another plugin uses ‘portfolio’, your site breaks. Always prefix custom post type names.
How many custom post types can I have?
No technical limit. But each adds admin menu items. Keep it reasonable for user experience.
Will this work with any theme?
Yes! The post type exists in database regardless of theme. Display depends on theme templates, but your shortcode (Video 6) will handle display regardless of theme.
Can I add custom fields to portfolio items?
Yes! With ‘custom-fields’ in supports array, users can add custom fields manually. For better UX, you’d use Advanced Custom Fields or build custom meta boxes (advanced topic).
Complete Code Reference
Here’s your complete class-wp-creative-portfolio.php file:
<?php
/**
 * Main portfolio functionality class
 *
 * @package WP_Creative_Portfolio
 */

if ( ! defined( 'ABSPATH' ) ) {
    exit;
}

class WP_Creative_Portfolio {

    /**
     * Constructor
     */
    public function __construct() {
        add_action( 'init', array( $this, 'register_portfolio_cpt' ) );
    }

    /**
     * Register Portfolio Custom Post Type
     */
    public function register_portfolio_cpt() {

        $options  = get_option( 'wp_creative_portfolio_options' );
        $plural   = ! empty( $options['plural_name'] ) ? $options['plural_name'] : 'Portfolios';
        $singular = ! empty( $options['singular_name'] ) ? $options['singular_name'] : 'Portfolio';
        $slug     = ! empty( $options['slug'] ) ? $options['slug'] : 'portfolio';

        $labels = array(
            'name'               => $plural,
            'singular_name'      => $singular,
            'add_new'            => 'Add New',
            'add_new_item'       => 'Add New ' . $singular,
            'edit_item'          => 'Edit ' . $singular,
            'new_item'           => 'New ' . $singular,
            'view_item'          => 'View ' . $singular,
            'search_items'       => 'Search ' . $plural,
            'not_found'          => 'No ' . $plural . ' found',
            'not_found_in_trash' => 'No ' . $plural . ' found in Trash',
            'all_items'          => 'All ' . $plural,
            'menu_name'          => $plural,
            'name_admin_bar'     => $singular,
        );

        $args = array(
            'labels'              => $labels,
            'public'              => true,
            'publicly_queryable'  => true,
            'show_ui'             => true,
            'show_in_menu'        => true,
            'query_var'           => true,
            'rewrite'             => array(
                'slug'       => $slug,
                'with_front' => true,
                'pages'      => true,
                'feeds'      => true,
            ),
            'capability_type'     => 'post',
            'has_archive'         => true,
            'hierarchical'        => false,
            'menu_position'       => 20,
            'menu_icon'           => 'dashicons-portfolio',
            'supports'            => array(
                'title',
                'editor',
                'thumbnail',
                'excerpt',
                'custom-fields',
                'revisions',
            ),
            'show_in_rest'        => true,
            'rest_base'           => 'portfolio',
        );

        register_post_type( 'wp_portfolio', $args );
    }
}
Next Steps
Your portfolio plugin now has a home for data. In the next tutorial, you’ll learn:
Video/Post 4: How to Create Custom Taxonomy in WordPress Plugin
-
Adding categories to organize portfolio items
-
Understanding hierarchical vs non-hierarchical taxonomies
-
Connecting taxonomies to post types
-
URL structure for taxonomy archives
How to Create Custom Taxonomy (Coming soon)
Troubleshooting Checklist
If something isn’t working, go through this checklist:
-
Class file exists in correct location
-
Main plugin file includes the class
-
Constructor hooks to ‘init’ action
-
No PHP errors (enable WP_DEBUG)
-
Flushed rewrite rules (Settings → Permalinks)
-
Created at least one portfolio item
-
Checked frontend URLs
Share Your Progress!
Built your first custom post type? Share your success in the comments! Having issues? Drop your question below with:
-
What you expected to happen
-
What actually happened
-
Any error messages
I personally read and respond to every comment.
Coming up next (Video/Post 4): How to Create a Custom Taxonomy in a WordPress Plugin — where you’ll learn how to structure and organize your custom post types the right way. A full in-depth video walkthrough is also coming to give you complete clarity.