Starting your first website feels overwhelming. You’ve chosen WordPress because it powers 43% of all websites, but now you’re staring at your hosting dashboard wondering where to click.
I remember my first WordPress installation. I spent hours clicking wrong buttons, created three databases by accident, and almost gave up. Looking back, the process was simple – I just needed someone to explain it clearly without assuming I knew technical terms. If you’re completely new and still wondering what WordPress actually is, start with our What Is WordPress? A Beginner-Friendly Introduction before continuing with this installation guide.
That’s exactly what this guide does. I’ll walk you through installing WordPress three different ways, explain what each button means, and show you exactly what to do after installation. No assumed knowledge, no skipped steps, and definitely no plagiarism – just original, practical guidance from someone who’s done this hundreds of times.
Let’s turn that empty domain into a working website.
Quick Answer:
To install WordPress, log into your hosting account, use the one-click installer, choose your domain, set admin details, and click install. The process takes 3–5 minutes.
Table of Contents
- What You Need Before Installing WordPress
- Method 1: Install WordPress Using One-Click Installer
- Method 2: Install WordPress Manually from cPanel
- Method 3: Install WordPress on Localhost
- What to Do After Installing WordPress
- Common WordPress Installation Errors (And Fixes)
- Frequently Asked Questions
- Final Thoughts
Before You Start: Understanding What WordPress Needs
WordPress is software that needs three things to run. Think of it like a car – WordPress is the engine, but you need fuel, a chassis, and wheels to make it move.
Web Hosting: Your Digital Land
Web hosting is space on a server that’s always connected to the internet. When someone types your domain name, the hosting server sends your WordPress files to their browser.
What to look for in hosting:
-
One-click WordPress installation – Saves you time
-
PHP version 7.4 or higher – WordPress needs this to run
-
MySQL version 5.6 or higher – For your database
-
24/7 customer support – Trust me, you’ll want this
Most shared hosting plans under $10/month work perfectly for new sites. Companies like SiteGround, Hostinger, and Bluehost specifically optimize for WordPress. These hosting companies are only for example, while almost all hosting providers provide above mentioned features.
Domain Name: Your Website’s Address
Your domain is what people type to find you. Choose something:
-
Easy to spell out loud
-
Related to your content
-
Without hyphens or numbers if possible
-
Using .com when available (though .org, .net, and country codes work fine)
Many hosting companies include a free domain for the first year. Check during signup as It is easy to save some bucks or start a learning without spending a penny.
FTP Client (Optional)
FTP software lets you transfer files between your computer and hosting server. FileZilla is free and works on all systems. You’ll only need this for manual installation.
Note: Don’t worry if all the steps above feel overwhelming at first — everything seems complicated until you try it yourself. That’s why I recommend starting on a local hosting environment. This way, you can experiment freely, make mistakes, and learn without any risk. Once you feel confident, you can move on to setting up your live website.
Method 1: How to Install WordPress Using One-Click Auto Installer
Most hosting providers include tools that install WordPress automatically. This takes 3-5 minutes and requires no technical skills.
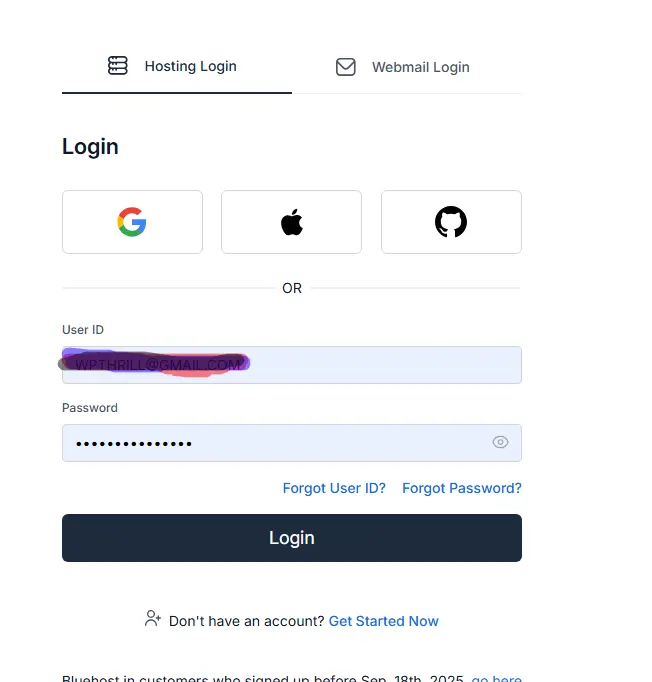
Step 1: Log Into Your Hosting Account
Open your hosting provider’s website and log in. Look for a button saying “Login” or “Client Area.” You should have received login details in your welcome email.
Once logged in, you’ll see your hosting dashboard. This looks different for every company, but the elements are similar.
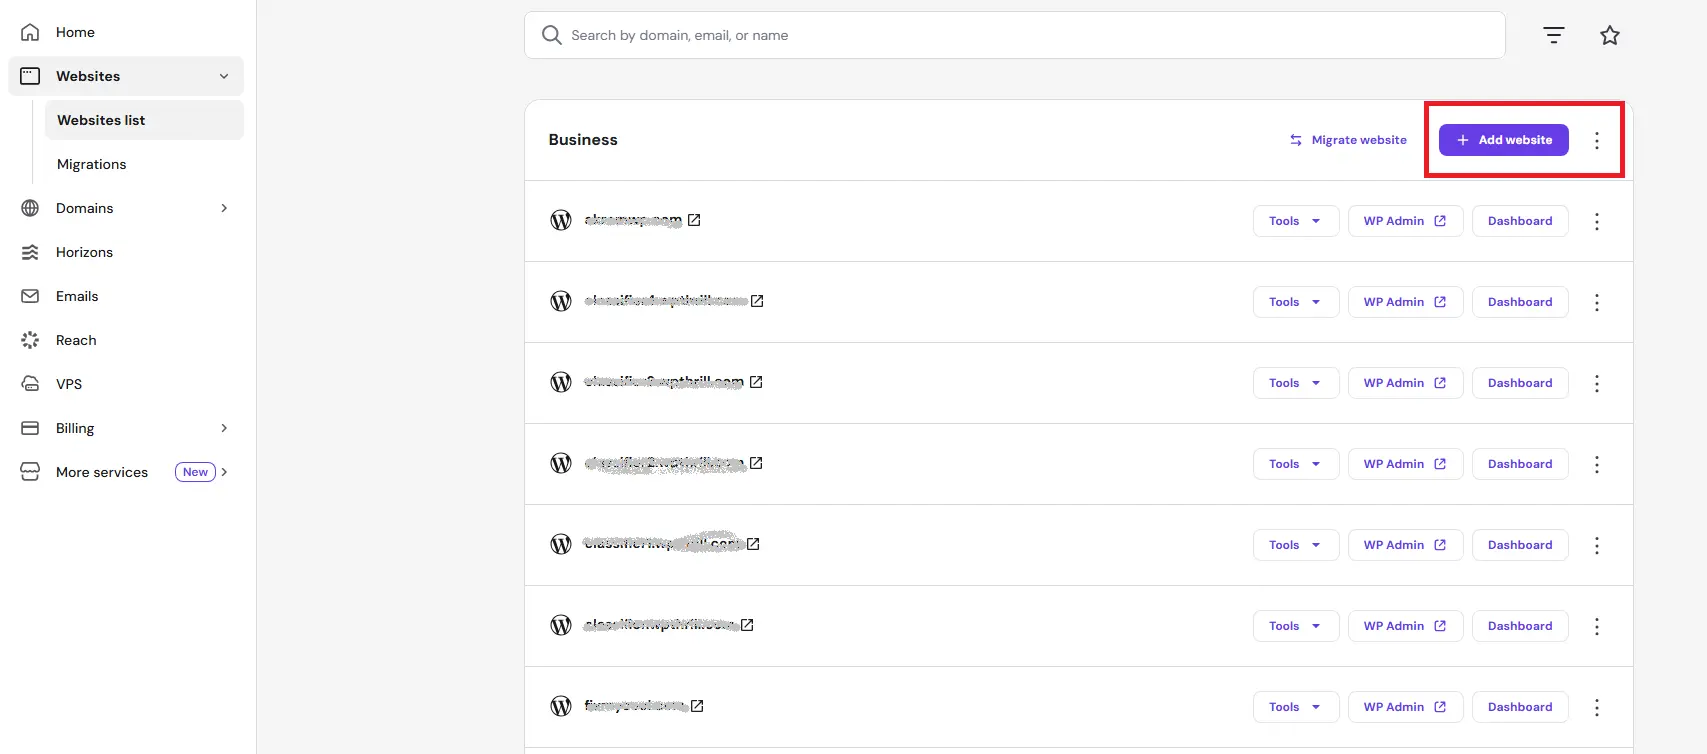
Step 2: Find the WordPress Installer
Look for one of these names in your dashboard:
-
WordPress Installer
-
Softaculous
-
QuickInstall
-
Installatron
-
Apps Installer
If you’re unsure, search for “WordPress” using the dashboard search bar – most modern hosting panels have one at the top.
Click on the WordPress icon when you find it.
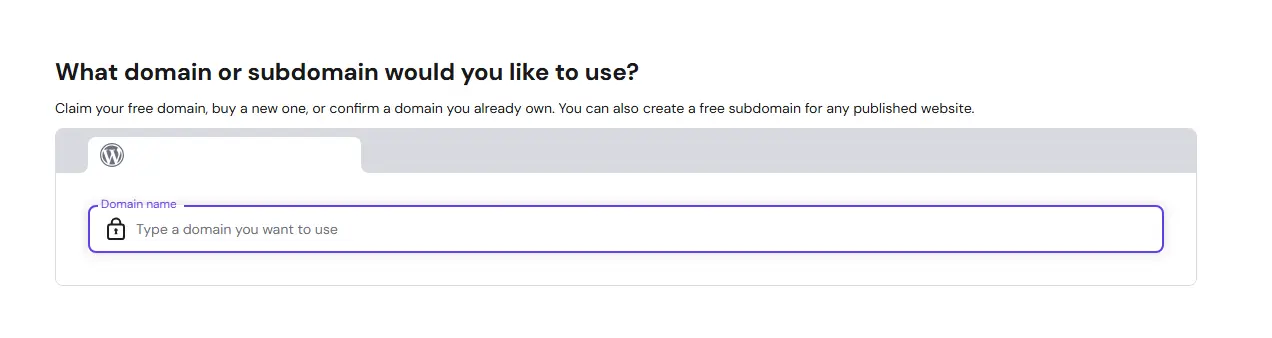
Step 3: Choose Your Domain
The installer will ask which domain to use. If you have multiple domains, select yours from the dropdown menu. Leave the directory field blank unless you want WordPress in a subfolder like yourdomain.com/blog.
Quick tip: Installing in the root (leaving directory blank) puts WordPress directly on your main domain. Installing in a subfolder works well if you already have a website there and want to add a blog section.
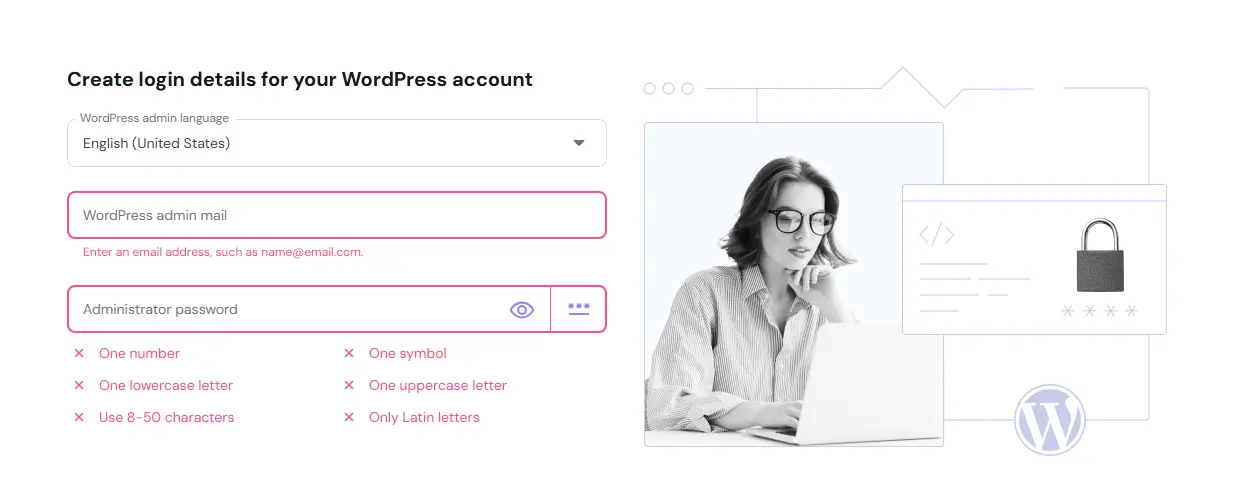
Step 4: Configure Site Settings
Now you’ll see a form asking for your site details:
Site Name
This is your website’s title – what appears in browser tabs and search results. You can change it anytime, so don’t stress about perfection.
Site Description
A short tagline explaining what your site does. Think of it as your elevator pitch in 10 words.
Admin Username
This is your login name. Choose something memorable but not obvious. Avoid “admin” – hackers try this first.
Admin Password
Most installers show a password strength meter. Use a mix of uppercase, lowercase, numbers, and symbols. Many installers can generate a strong password for you – save this somewhere safe.
Admin Email
Enter an email you check regularly. WordPress sends notifications here about comments, updates, and password resets.
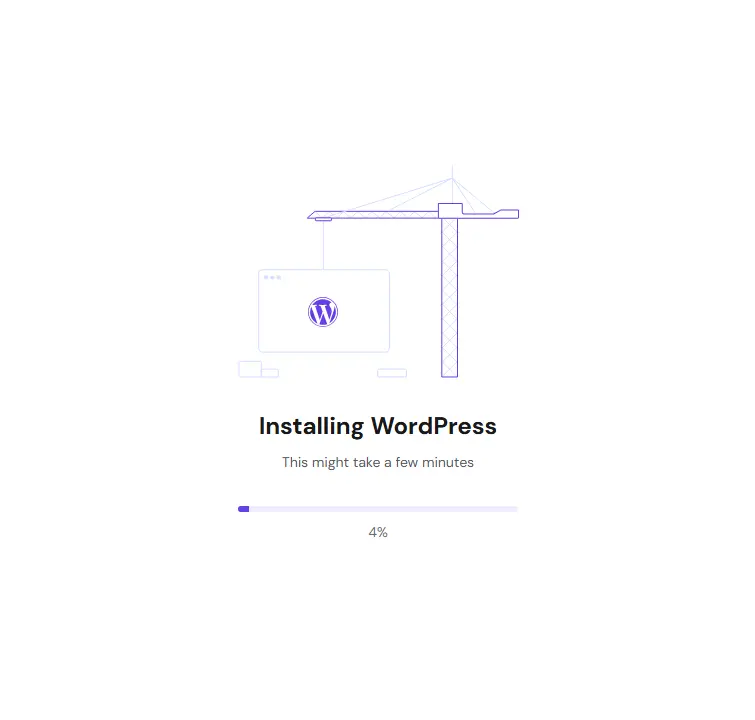
Step 5: Click Install
Scroll down and click the install button. The system will create your database, install WordPress files, and set up your admin account.
A progress bar shows the installation status. This usually takes 30-90 seconds.
Step 6: Save Your Login Information
When installation finishes, you’ll see a success message with your site URL and admin login link. Copy these somewhere safe. Some installers also email the details to you.
Click the admin URL to log in and start building.
Done! Your WordPress site is now live.
Method 2: Install Using cPanel WordPress Toolkit
If your hosting uses cPanel (a common control panel), the WordPress Toolkit offers more management features beyond simple installation.
Step 1: Access cPanel
Log into your hosting account and look for the cPanel login link. This might be a direct button or a separate URL like yourdomain.com/cpanel.
Use your hosting username and password to access cPanel.
Step 2: Locate WordPress Toolkit
Once in cPanel, scroll through the interface or use the search function. WordPress Toolkit appears under the “Domains” section. It looks like a WordPress logo with tools around it.
Click to open the toolkit.
Step 3: Start Installation
The WordPress Toolkit shows any existing WordPress sites and a blue “Install” button at the top. Click this button to begin.
Step 4: Fill Installation Details
A panel slides out with installation options:
Installation Location
-
Choose your domain from the dropdown
-
Leave path empty for root installation
Site Title
Enter your website name
Admin User Details
-
Create a username
-
Generate or create a strong password
-
Add your email address
Language
Select your preferred WordPress interface language
Advanced Options (click to expand)
-
Database details are auto-filled – beginners should leave these alone
-
Keep “Automatically apply security updates” checked

Step 5: Complete Installation
Click “Install” and wait about a minute. The toolkit shows installation progress and confirms completion.
From here, you can:
-
Click “Log in to Admin” to access your site
-
Install recommended plugins
-
Set up caching
-
Configure security settings
Step 6: Explore Toolkit Features
WordPress Toolkit offers useful features beyond installation:
-
Clone Site – Create test copies
-
Update Management – Update multiple sites at once
-
Security Settings – Configure basic protection
-
Caching Controls – Speed up your site
These tools make WordPress Toolkit worth using even if you know how to install manually.
Method 3: Manual Installation (Complete Control)
Auto-installers work great, but manual installation teaches you how WordPress actually works. This method takes 20-30 minutes and requires attention to detail.
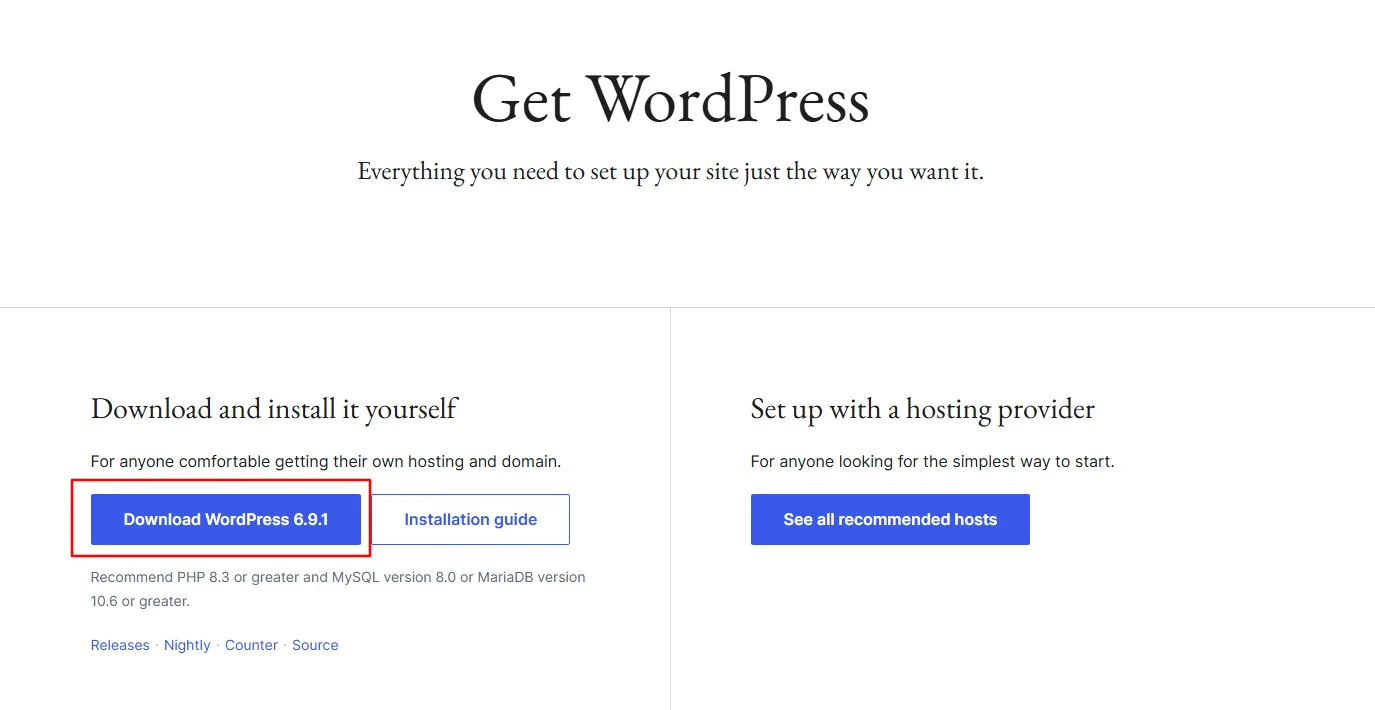
Step 1: Download WordPress
Go to wordpress.org/download and click the blue “Download WordPress” button. This downloads a ZIP file containing everything needed for a WordPress site.
The file is about 20MB and unzips to roughly 60MB of files and folders.
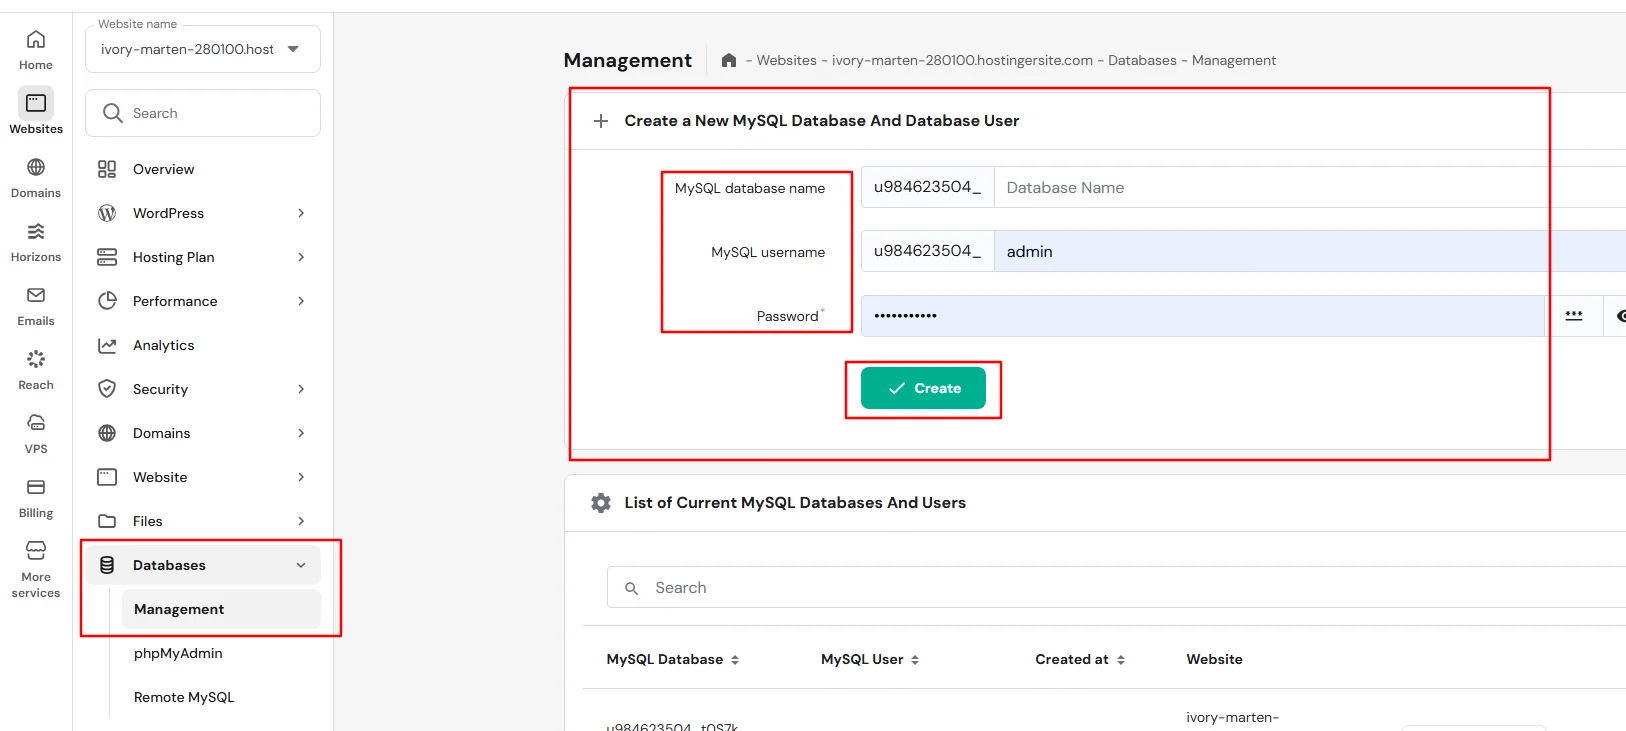
Step 2: Create Your Database
WordPress stores all content – posts, pages, user information, settings – in a database. You need to create this before WordPress can install.
In cPanel:
-
Find the “MySQL Databases” icon (usually under Databases section)
-
Create a new database – name it something like “wordpress_main” or “site_db”
-
Create a database user – use a strong password
-
Add the user to the database with “All Privileges”
Important: Write down the database name, username, and password exactly as you entered them. One wrong character prevents installation.
Step 3: Upload WordPress Files
You have two options here. Choose based on your comfort level.
Option A: Using File Manager (Simpler)
-
In cPanel, open File Manager
-
Navigate to “public_html” – this is your website’s root folder
-
Click “Upload” and select your downloaded WordPress ZIP
-
Once uploaded, select the ZIP file and click “Extract”
-
Move all extracted files from the “wordpress” folder directly into public_html
Option B: Using FTP (More Control)
-
Install FileZilla from filezilla-project.org
-
Get FTP credentials from your hosting control panel
-
In FileZilla, enter:
-
Host: Your domain or server IP
-
Username: Your FTP username
-
Password: Your FTP password
-
Port: 21 (default)
-
-
Click “Quickconnect”
-
On the right side (remote server), navigate to public_html
-
On the left side (your computer), navigate to your unzipped WordPress folder
-
Drag all WordPress files from left to right
Step 4: Rename Configuration File
In your uploaded WordPress files, find “wp-config-sample.php” in the public_html folder. Rename this file to “wp-config.php”.
You can do this in File Manager by right-clicking the file and selecting “Rename”, or in FileZilla by right-clicking and choosing “Rename”.
Step 5: Edit Configuration File
Open your new “wp-config.php” file for editing. In File Manager, right-click and select “Edit” or “Code Edit”. In FileZilla, you can download the file, edit it on your computer, and upload it back.
Find these lines:
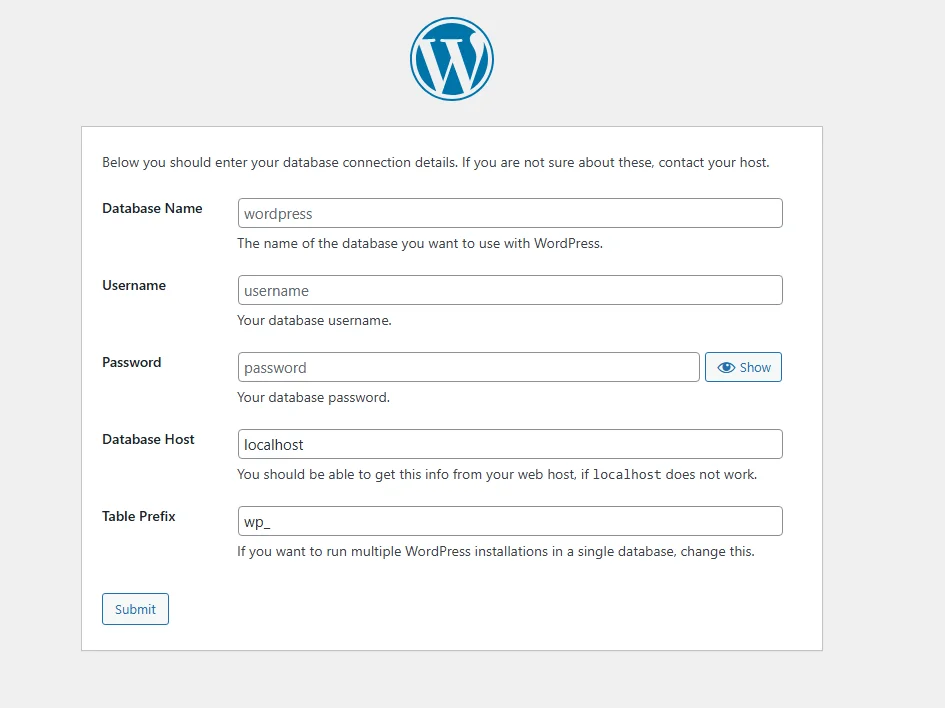
define( 'DB_NAME', 'database_name_here' );
define( 'DB_USER', 'username_here' );
define( 'DB_PASSWORD', 'password_here' );
define( 'DB_HOST', 'localhost' );
Replace the placeholder values with your actual database details:
-
database_name_here → your actual database name
-
username_here → your database username
-
password_here → your database user password
-
localhost usually stays as “localhost” (change only if your host specified otherwise)
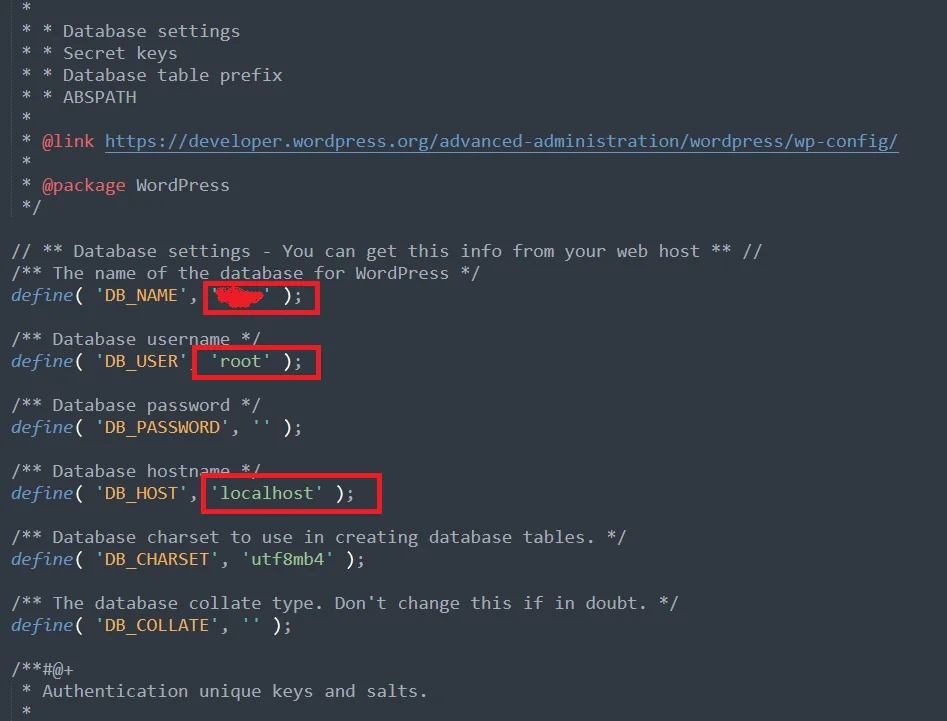
Step 6: Save and Close
Save your changes and close the file. Double-check that you saved – this is where most manual installation errors happen.
Step 7: Run Installation Script
Open your web browser and type your domain name (like yoursite.com). You should see the WordPress installation welcome screen.
Click “Let’s Go!” to begin.
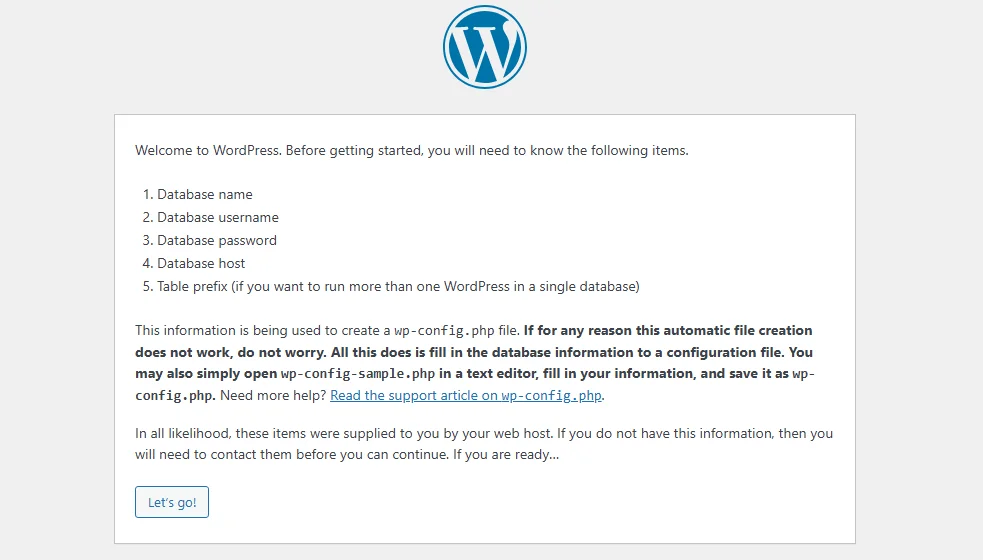
Step 8: Enter Site Information
You’ll see a form asking for:
Site Title
Your website’s name – this appears in search results and browser tabs.
Username
Choose your admin login name. Make it memorable but not obvious.
Password
WordPress shows a strength meter. Create something strong or use the generated password. Save it somewhere safe.
Your Email
Enter a valid email address. WordPress uses this for important notifications.
Search Engine Visibility
Leave this unchecked. Checking it tells search engines to ignore your site – you don’t want that unless you’re building a private site.
Step 9: Complete Installation
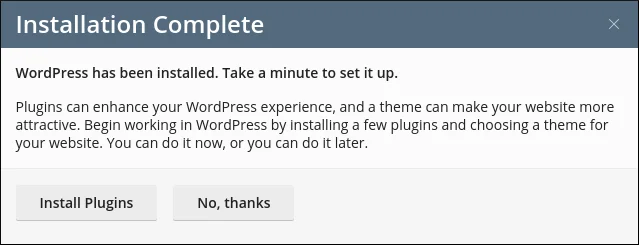
Click “Install WordPress” and wait a few seconds. You’ll see a success message with a login button.
Click “Log In” and enter your new username and password. You’re now in your WordPress dashboard.
Manual installation complete!
What To Do After Installing WordPress
Installation is just the beginning. Here’s what to do next:
1. Remove Default Content
WordPress installs with a sample post, page, and comment. Delete these to start fresh:
-
Go to Posts → All Posts, hover over “Hello World,” click Trash
-
Go to Pages → All Pages, hover over “Sample Page,” click Trash
-
Go to Comments, hover over the sample comment, click Trash
2. Set Your Permalink Structure
Permalinks are your URLs. Good structure helps visitors and search engines understand your content.
Go to Settings → Permalinks, select “Post Name,” and click Save Changes. Your URLs will now look like yoursite.com/sample-post instead of yoursite.com/?p=123.

3. Choose a Theme
Themes control your site’s appearance. Thousands of free themes are available:
Go to Appearance → Themes → Add New. Browse or search for something you like. Popular free options include:
-
Astra (lightweight, works with page builders)
-
Kadence (customizable, good for beginners)
-
GeneratePress (fast, developer-friendly)
-
Twenty Twenty-Four (WordPress default, clean design)
Click “Install” then “Activate” on your chosen theme.
4. Install Essential Plugins
Plugins add features. Start with these basics:
Security: Wordfence or All In One Security
Backups: UpdraftPlus (backs up to cloud storage)
SEO: Rank Math or Yoast SEO
Forms: WPForms Lite or Contact Form 7
Speed: LiteSpeed Cache or W3 Total Cache
Go to Plugins → Add New, search for each, click Install Now, then Activate.
5. Create Essential Pages
Most sites need these pages:
-
Home (your front page)
-
About (tell visitors who you are)
-
Contact (let people reach you)
-
Privacy Policy (required by law in many places)
Go to Pages → Add New, create each page, and Publish when done.
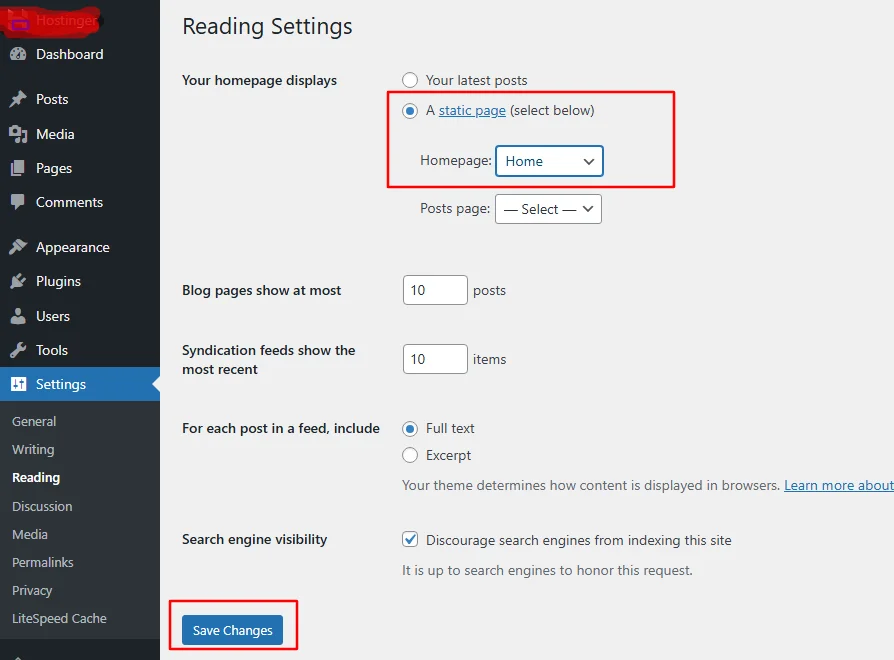
6. Set Your Homepage
By default, WordPress shows your latest posts on the homepage. To use a static page:
-
Create a page called “Home” and one called “Blog”
-
Go to Settings → Reading
-
Set “Your homepage displays” to “A static page”
-
Select “Home” for homepage and “Blog” for posts page
-
Click Save Changes
Common Installation Problems and Fixes
Even following instructions carefully, things can go wrong. Here’s how to fix common issues.
Database Connection Error
What you see: “Error establishing a database connection” Here is our full guide how to fix Error establishing a database connection
Why it happens: WordPress can’t connect to your database.
How to fix:
-
Check wp-config.php for typos in database name, username, or password
-
Verify the database exists in cPanel’s MySQL Databases
-
Confirm your database user has privileges for the database
-
Try changing DB_HOST from “localhost” to “127.0.0.1” or your host’s specific server name
White Screen of Death
What you see: A completely blank white page, here is a detailed guide to fix White Screen of Death Issue in WordPress
Why it happens: PHP error but error display is turned off
How to fix:
-
Enable debugging by adding to wp-config.php (above “That’s all” line): Check How to Enable Debug Mode in WordPress
define('WP_DEBUG', true); -
The error message will appear, telling you what file has the problem
-
Common causes: exhausted memory limit or plugin conflict
-
Add memory limit line to wp-config.php:
define('WP_MEMORY_LIMIT', '256M');
404 Errors on Pages
What you see: “404 Not Found” when clicking pages
Why it happens: Permalink structure changed but rewrite rules didn’t update
How to fix:
-
Go to Settings → Permalinks
-
Click “Save Changes” without changing anything
-
This flushes the rewrite rules and usually fixes 404 errors
FTP Credentials Request
What you see: WordPress asking for FTP details when installing plugins
Why it happens: File permissions prevent WordPress from writing files directly
How to fix:
-
Add to wp-config.php:
define('FS_METHOD', 'direct'); -
Or fix file permissions via FTP (folders: 755, files: 644)
“Headers Already Sent” Error
What you see: Error message mentioning headers already sent
Why it happens: Extra spaces or characters before PHP tags
How to fix:
-
Check wp-config.php for any spaces before
<?phpat the top -
Check functions.php in your theme for spaces before
<?phpor after?> -
Remove closing
?>tags from PHP files – they’re optional and often cause this
Installation Stuck at Certain Percent
What you see: Progress bar stops moving
Why it happens: Server timeout or resource limit
How to fix:
-
Wait 5 minutes – sometimes servers are slow
-
Refresh the page – installation may have completed but display stalled
-
Check if site works at yourdomain.com/wp-admin
-
Contact hosting support if nothing works
Frequently Asked Questions
How much does WordPress cost?
WordPress itself is free. You pay for hosting ($3–15/month) and a domain ($10–15/year). Premium themes and plugins cost extra but are optional.
Can I install WordPress on my computer for testing?
Yes. Use Local (by Flywheel), XAMPP, or WAMP to create a testing environment on your Windows or Mac computer. This is great for learning before going live.
What’s the difference between WordPress.org and WordPress.com?
WordPress.org (covered in this guide) gives you full control and requires hosting. WordPress.com hosts your site for you but limits customization unless you pay for upgrades.
Which installation method is best for beginners?
The auto-installer method. It’s the fastest option, handles technical details automatically, and reduces the chance of errors. Learn manual installation later when you’re comfortable.
How long does WordPress installation take?
Auto-installer: 3–5 minutes. WordPress Toolkit: 5–7 minutes. Manual installation: 20–30 minutes if you’re following instructions carefully.
Do I need to back up before installing WordPress?
There’s nothing to back up before a fresh installation. After you add content, set up automatic backups with a plugin like UpdraftPlus.
Can I change my domain name after installing WordPress?
Yes, but it requires database updates. Use a plugin like “Better Search Replace” or follow WordPress documentation carefully to avoid broken links.
Why does WordPress ask for FTP credentials during updates?
This happens when WordPress doesn’t have direct file access. Add define('FS_METHOD', 'direct'); to wp-config.php to fix it, or adjust file permissions.
Is WordPress secure?
WordPress itself is secure, but overall security depends on your practices. Keep everything updated, use strong passwords, install a security plugin, and back up regularly.
What if I make a mistake during manual installation?
You can start over. Delete all WordPress files from public_html, drop (delete) your database in cPanel, and begin again from Step 1.
Final Thoughts
Installing WordPress is like setting up a new apartment. The first time takes effort, you’ll check everything twice, and you might make some mistakes. By the third time, you’ll do it without thinking.
Start with the auto-installer method. It’s reliable, fast, and eliminates the most common error points. Once you’re comfortable with WordPress, try manual installation on a test site to understand how everything connects.
Remember these key points:
-
Your hosting account holds all your files – keep login details safe
-
The database stores your content – back it up regularly
-
Your wp-config.php file contains sensitive information – never share it
-
The auto-installer works perfectly for 95% of websites
You now have a working WordPress site. The hard part is done. What comes next – choosing themes, adding plugins, creating content – is the fun part where your site becomes uniquely yours.
Questions about installation? Drop them in the comments below. Include your hosting company and which method you tried, and I’ll help you get unstuck.
In our next tutorial, I’ll show you exactly how to get self-hosted WordPress installed and running in under 15 minutes.
Next Tutorial: How to Login to WordPress Admin (wp-admin) (COMING SOON)
Previous Tutorial: WordPress.com vs WordPress.org – What’s the Difference? (Complete Guide)
Still unsure which version fits your situation? Drop a comment describing what you want to build, and I’ll help you decide!